10 December 2010
25 November 2010
solution: SSH login takes long time
vi /etc/ssh/sshd_config
   >> UseDNS no

# sshd -ddd
# ssh -vvv
Reference:
http://ubuntuforums.org/archive/index.php/t-630623.html
get clipboard from a linux VNC server
vi ~/.vnc/xstartup
   >> vncconfig -nowin &
Reference:
http://www.g-loaded.eu/2005/11/10/configure-vnc-server-in-fedora
25 October 2010
change realtime priority of a linux process
Get the sample program from here
Reference:
http://www.helsinki.fi/atk/unix/dec_manuals/DOC_40D/APS33DTE/DOCU_003.HTM
[root@localhost ~]# uname -a
Linux ... 2.6.21-1.3194.fc7 #1 SMP ... GNU/Linux

# gcc -o realtime linux_realtime.c
# ./realtime
Round-robin quantum is 0 seconds, 99984800 nanoseconds
Sched getparam: current policy 0
Sched getparam: current priority 0
RR min prio: 1
RR max prio: 99
Completed test 0
Completed test 1
Completed test 2
Completed test 3
Completed test 4
Completed test 5
Completed test 6
Completed test 7
Completed test 8
Completed test 9
Reference:
http://www.helsinki.fi/atk/unix/dec_manuals/DOC_40D/APS33DTE/DOCU_003.HTM
15 October 2010
Working of traceroute
In Windows:
Windows starts out sending a ping echo request packet with a TTL of 1 to the destination, when a router encounters the packet and begins to process the request it decrements the TTL by 1. When the TTL reaches 0 the router sends back a Time to live exceeded in transit error message. Windows will then two more packets with the same TTL and records the round trip time for that router. Next the Windows client will increment the TTL by 1 reaching each router until the packet finds it final destination and the Windows client receives the echo reply.
Download sample tracert file for windows from here
In Linux:
Linux starts out sending out 3 UDP packets with a TTL of 1 to the destination, when a router encounters the packet and begins to process the request it decrements the TTL by 1. When the TTL reaches 0 the router sends back a ICMP Time-to-Live Exceeded error message. Next the Linux client will increment the TTL by 1 reaching each router until the packet finds it final destination.
Since you are sending UDP packets with the destination address of the host you are concerned with, once it gets to the destination the UDP packet is wanting to connect to the port that you have sent as the destination port, since it is an uncommon port, it will most like be rejected with an ICMP Destination Unreachable (Type 3), Port Unreachable (Code 3). This ICMP message is sent back to your machine, which will understand this as being the last hop, therefore traceroute will exit, giving you the hops between you and the destination.
Download sample traceroute file for linux from here
Download c program to update mac address from here
Reference:
http://suncoastsecuritysociety.org/blog/2009/08/13/how-does-tracert-work-windows/
http://www.tek-tips.com/faqs.cfm?fid=381
http://www.exit109.com/~jeremy/news/providers/traceroute.html
Windows starts out sending a ping echo request packet with a TTL of 1 to the destination, when a router encounters the packet and begins to process the request it decrements the TTL by 1. When the TTL reaches 0 the router sends back a Time to live exceeded in transit error message. Windows will then two more packets with the same TTL and records the round trip time for that router. Next the Windows client will increment the TTL by 1 reaching each router until the packet finds it final destination and the Windows client receives the echo reply.
Download sample tracert file for windows from here
C:\>tracert www.google.com

Tracing route to www.l.google.com [209.85.231.104]
over a maximum of 30 hops:

  1     3 ms     2 ms     3 ms  192.168.1.1
  2    66 ms    35 ms    39 ms  122.178.216.1
  3    47 ms    90 ms    44 ms  122.166.32.101
  4   116 ms    60 ms    49 ms  122.166.32.9
  5    89 ms   103 ms    53 ms  122.175.255.29
  6    57 ms    43 ms    64 ms  203.101.100.210
  7    67 ms   101 ms    58 ms  72.14.216.229
  8    79 ms    72 ms    38 ms  66.249.94.170
  9    45 ms    35 ms    38 ms  72.14.238.90
 10    39 ms    50 ms    51 ms  maa03s01-in-f104.1e100.net [209.85.231.104]

Trace complete.
In Linux:
Linux starts out sending out 3 UDP packets with a TTL of 1 to the destination, when a router encounters the packet and begins to process the request it decrements the TTL by 1. When the TTL reaches 0 the router sends back a ICMP Time-to-Live Exceeded error message. Next the Linux client will increment the TTL by 1 reaching each router until the packet finds it final destination.
Since you are sending UDP packets with the destination address of the host you are concerned with, once it gets to the destination the UDP packet is wanting to connect to the port that you have sent as the destination port, since it is an uncommon port, it will most like be rejected with an ICMP Destination Unreachable (Type 3), Port Unreachable (Code 3). This ICMP message is sent back to your machine, which will understand this as being the last hop, therefore traceroute will exit, giving you the hops between you and the destination.
Download sample traceroute file for linux from here
# traceroute www.google.com
traceroute to www.google.com (209.85.231.104), 30 hops max, 60 byte packets
 1  192.168.1.1 (192.168.1.1)  6.246 ms  6.660 ms  10.447 ms
 2  122.178.216.1 (122.178.216.1)  108.220 ms  107.885 ms  108.977 ms
 3  122.166.32.101 (122.166.32.101)  107.723 ms  108.607 ms  118.167 ms
 4  122.166.32.9 (122.166.32.9)  124.062 ms  124.725 ms  135.976 ms
 5  122.175.255.29 (122.175.255.29)  136.151 ms  135.961 ms  136.123 ms
 6  * 203.101.95.30 (203.101.95.30)  69.910 ms  71.222 ms
 7  72.14.216.229 (72.14.216.229)  148.436 ms  148.394 ms  148.744 ms
 8  66.249.94.170 (66.249.94.170)  148.130 ms  148.855 ms  148.582 ms
 9  72.14.238.90 (72.14.238.90)  158.229 ms  158.211 ms  158.363 ms
10  * * *
...
...
29  * * *
30  * * *
Download c program to update mac address from here
gcc -o upmac upmac.c
./upmac trwin.cap trwin2.cap -i 192.168.10.101 \
        -m 00:11:22:33:44:55 -n 00:55:44:33:22:11
Reference:
http://suncoastsecuritysociety.org/blog/2009/08/13/how-does-tracert-work-windows/
http://www.tek-tips.com/faqs.cfm?fid=381
http://www.exit109.com/~jeremy/news/providers/traceroute.html
21 September 2010
Network Packet Generator
Use Colasoft Packet generator to create ICMP packet:

npg ascii file to generate ICMP Address Mask
npg ascii file to generate ICMP Echo to google
Use the input from Colosoft packet generator tool to create "ngp ascii packet" packet.txt
OR
Get the linux code to send raw 802.3 packet "rawpacket.c".
Reference:
http://www.wikistc.org/wiki/Network_packet_generator
http://www.colasoft.com/download/products/download_packet_builder.php
Npg1.3.0.zip

npg ascii file to generate ICMP Address Mask
npg ascii file to generate ICMP Echo to google
Use the input from Colosoft packet generator tool to create "ngp ascii packet" packet.txt
npg -vvv -f packet.txt
OR
Get the linux code to send raw 802.3 packet "rawpacket.c".
gcc rawpacket.c -o rawpacket
./rawpacket
Reference:
http://www.wikistc.org/wiki/Network_packet_generator
http://www.colasoft.com/download/products/download_packet_builder.php
Npg1.3.0.zip
14 September 2010
Install Canon ZoomBrowser with out CD
Download latest ZoomBrowser EX 6.5.1
update registry by creating following folders
Reference:
http://www.northlight-images.co.uk/article_pages/install_canon_software.html
update registry by creating following folders
Windows Registry Editor Version 5.00Install latest ZoomBrowser EX
[HKEY_LOCAL_MACHINE\SOFTWARE\Canon\EOS Utility]
[HKEY_LOCAL_MACHINE\SOFTWARE\Canon\DPP]
[HKEY_LOCAL_MACHINE\SOFTWARE\Canon\ZoomBrowser EX\Install]
[HKEY_LOCAL_MACHINE\SOFTWARE\Canon\PhotoStitch
[HKEY_LOCAL_MACHINE\SOFTWARE\Canon\EOS Capture]
[HKEY_LOCAL_MACHINE\SOFTWARE\Canon\EOSViewerUtility]
Reference:
http://www.northlight-images.co.uk/article_pages/install_canon_software.html
01 September 2010
howto create bootable CDROM in linux - 2
Please refer howto create bootable CDROM in linux - 1.
download latest nasm from here.
download latest syslinux from here.
Install glibc-static from here.
Download BusyBox from here.
Download BusyBox config file from here.
create initrd:
download linux 2.6.35 config file from here.
create bootable iso image with linux kernel and initrd.img:
Reference:
http://syslinux.zytor.com/wiki/index.php/Download
http://www.clusters.umaine.edu/wiki/index.php/Building_a_Minimal_Linux_Image
download latest nasm from here.
tar xzvf nasm-2.08.02.tar.gz
cd nasm-2.08.02
./configure && make && make install
/usr/local/bin/nasm got installed
download latest syslinux from here.
tar xzvf syslinux-4.02.tar.gz
cd syslinux-4.02
make && make install
/usr/share/syslinux/isolinux.bin got installed
Install glibc-static from here.
Download BusyBox from here.
Download BusyBox config file from here.
tar xjbf busybox-1.17.1.tar.bz2
cd busybox-1.17.1
cp initrd.config .config
make && make install
_install/* got installed
create initrd:
dd if=/dev/zero of=initrd-new.img bs=1k count=4096
mke2fs -F initrd-new.img
mkdir -p initrd
mount initrd-new.img initrd -o loop

cd initrd
cp -a ../busybox-1.17.1/_install/* .
mkdir -p bin lib dev etc/init.d mnt proc root sbin sys
cat > etc/inittab << EOF
# This is run first except when booting in single-user mode.
::sysinit:/etc/init.d/rcS

# Start an "askfirst" shell on the console (whatever that may be)
::askfirst:/bin/sh

# Stuff to do when restarting the init process
::restart:/sbin/init

# Stuff to do before rebooting
::ctrlaltdel:/sbin/reboot
::shutdown:/bin/umount -a -r
::shutdown:/sbin/swapoff -a
EOF

cat > etc/fstab << EOF
sysfs     /sys       sysfs   defaults 0 0
proc      /proc      proc    defaults 0 0
/dev/sr0  /mnt/cdrom iso9660 defaults 0 0
EOF

cat > etc/init.d/rcS << EOF
#!/bin/sh

mkdir -p /proc /sys /dev/pts /mnt/cdrom
/bin/mount -t proc proc /proc
/bin/mount -t sysfs sysfs /sys
/sbin/mdev -s 2>/dev/null
/bin/mount -a
mount -t devpts devpts /dev/pts
ln -sf /proc/mounts /etc/mtab

echo "Welcome to busybox powered linux ..."
EOF
chmod +x etc/init.d/rcS

mknod dev/ram0 b 1 0
mknod dev/null c 1 3
mknod dev/tty c 5 0
mknod dev/console c 5 1
mknod dev/tty0 c 4 0
mknod dev/tty1 c 4 1
cd ..
umount initrd
gzip -9 initrd-new.img
mv -f initrd-new.img.gz initrd.img
download linux 2.6.35 config file from here.
create bootable iso image with linux kernel and initrd.img:
yum install genisoimage
cp initrd.img .
cp config.35 .config
make oldconfig
make isoimage FDARGS="root=/dev/ram0 rw" FDINITRD=initrd.img
cp arch/x86/boot/image.iso bootcd.iso
Reference:
http://syslinux.zytor.com/wiki/index.php/Download
http://www.clusters.umaine.edu/wiki/index.php/Building_a_Minimal_Linux_Image
How to check whether the OS installed is 32-bit or 64-bit
Method 1
Method 2
Method 3
reference:
how to check if windows xp system is 32 bit or 64 bit
1. Click Start, then click on Run or Start Search.
2. Type msinfo32.exe and then press Enter key.
3. In “System Information”, review the value for the System Type item:
   * For 32-bit editions of Windows, the value of the System Type item
     is x86-based PC.
   * For 64-bit editions of Windows, the value of the System Type item
     is x64-based PC.
Method 2
1. Click Start, click Run, type sysdm.cpl, and then click OK.
2. Click the General tab. The operating system appears as follows:
   * For a 64-bit version operating system: Microsoft Windows XP
     Professional x64 Edition Version <Year> appears under System.
   * For a 32-bit version operating system: Microsoft Windows XP
     Professional Version <Year> appears under System.
Method 3
1. Click Start, click Run, type winmsd.exe, and then click OK.
2. In the details pane, locate Processor under Item. Note the value.
   * If the value that corresponds to Processor starts with x86,
     the computer is running a 32-bit version of the Windows operating system.
   * If the value that corresponds to Processor starts with ia64 or AMD64,
     the computer is running a 64-bit version of the Windows operating system.
reference:
how to check if windows xp system is 32 bit or 64 bit
23 August 2010
must install softwares in fedora 13
FFmpeg - FFmpeg is a complete, cross-platform solution to record, convert and stream audio and video.
qBittorrent - The qBittorrent project aims to provide a Free Software alternative to µtorrent.
Pidgin - Pidgin is an easy to use chat client for AIM, MSN, Yahoo, and more all at once.
qBittorrent - The qBittorrent project aims to provide a Free Software alternative to µtorrent.
Pidgin - Pidgin is an easy to use chat client for AIM, MSN, Yahoo, and more all at once.
Howto change gnome keyring password
NetworkManager won't ask for keyring password if login password and gnome-keyring password are same.
How to change the gnome keyring password:
Reference:
http://fedoraproject.org/wiki/Tools/NetworkManager
How to change the gnome keyring password:
$ seahorse
1. right click "Passwords:login"
2. select "Change Password"
Reference:
http://fedoraproject.org/wiki/Tools/NetworkManager
Solution to flashing wifi light in fedora 13
I have Compaq nc6400 laptop which have built-in wireless card.
(Intel Corporation PRO/Wireless 3945ABG)
1. I have enabled wireless and a blue WiFi light started flashing non-stop with traffic.
Reference:
http://forums.linuxmint.com/viewtopic.php?f=90&t=44829&start=0
http://linuxfocus.org/~guido/gentoo-x301/
(Intel Corporation PRO/Wireless 3945ABG)
1. I have enabled wireless and a blue WiFi light started flashing non-stop with traffic.
echo "#add to /etc/modprobe.d/wlan.conf" > /etc/modprobe.d/wlan.conf2. Restart the machine
echo "options iwlcore led_mode=1" >> /etc/modprobe.d/wlan.conf
Reference:
http://forums.linuxmint.com/viewtopic.php?f=90&t=44829&start=0
http://linuxfocus.org/~guido/gentoo-x301/
How to install WPA2-PSK in Fedoa 13
I have Compaq nc6400 laptop which have built-in wireless card.
(Intel Corporation PRO/Wireless 3945ABG)(iwl3945)
1. service NetworkManager restart
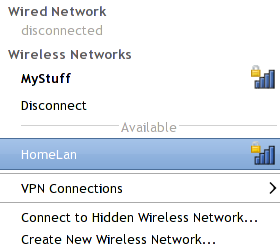

OR
1. edit wpa_supplicant config file
=> /etc/wpa_supplicant/wpa_supplicant.conf
4. sudo ifup wlan0
Reference:
http://hostap.epitest.fi/wpa_supplicant/
http://www.thinkwiki.org/wiki/Wpa_supplicant
http://fedoraproject.org/wiki/NetworkManager_in_Fedora_13
http://ftp.gnome.org/pub/GNOME/sources/NetworkManager/0.8/
(Intel Corporation PRO/Wireless 3945ABG)(iwl3945)
1. service NetworkManager restart

OR
1. edit wpa_supplicant config file
=> /etc/wpa_supplicant/wpa_supplicant.conf
ctrl_interface=/var/run/wpa_supplicant2. create "/bin/wireless"
ctrl_interface_group=0
ap_scan=1
network={
ssid="my_network"
proto=RSN
key_mgmt=WPA-PSK
pairwise=CCMP TKIP
group=CCMP TKIP
psk="secret_password"
}
#!/bin/sh3. sudo wireless
rmmod iwl3945
modprobe iwl3945
sleep 3
ifconfig wlan0 0.0.0.0
wpa_supplicant -d -c/etc/wpa_supplicant/wpa_supplicant.conf -iwlan0 -Dwext
4. sudo ifup wlan0
Reference:
http://hostap.epitest.fi/wpa_supplicant/
http://www.thinkwiki.org/wiki/Wpa_supplicant
http://fedoraproject.org/wiki/NetworkManager_in_Fedora_13
http://ftp.gnome.org/pub/GNOME/sources/NetworkManager/0.8/
22 August 2010
Howto create custom splash image
1. get the sample image to convert to grub splash from here.
2. gimp Kerala_backwater.jpg
3. quish the image down to 640x480 splash image size with Image > Scale > 640 x 480, Interpolation: Cubic
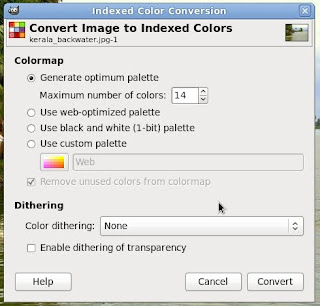
4. Convert down to the final 14-color indexed splash image format with Image > Mode > Indexed, 14 colors, No dithering, No transparent dithering

5. save it with the name "Kerala_backwater.xpm".
6. gzip -9 Kerala_backwater.xpm
Grub splash image is created with the name Kerala_backwater.xpm.gz.
Reference:
http://www.jnode.org/node/2357
21 August 2010
Reliance Netconnect in Fedora 13

you need root permission and wvdial software to use reliance netconnect in fedora.
1. connect reliance data card
2. run the command "wvdialconf"
$ sudo wvdialconf
Editing `/etc/wvdial.conf'.

Scanning your serial ports for a modem.

Modem Port Scan<*1>: S0   S1   S2   S3
WvModem<*1>: Cannot get information for serial port.
ttyUSB0<*1>: ATQ0 V1 E1 -- OK
ttyUSB0<*1>: ATQ0 V1 E1 Z -- OK
ttyUSB0<*1>: ATQ0 V1 E1 S0=0 -- OK
ttyUSB0<*1>: ATQ0 V1 E1 S0=0 &C1 -- OK
ttyUSB0<*1>: ATQ0 V1 E1 S0=0 &C1 &D2 -- OK
ttyUSB0<*1>: ATQ0 V1 E1 S0=0 &C1 &D2 +FCLASS=0 -- OK
ttyUSB0<*1>: Modem Identifier: ATI -- Manufacturer: +GMI: HUAWEI TECHNOLOGIES CO., LTD
ttyUSB0<*1>: Speed 9600: AT -- OK
ttyUSB0<*1>: Max speed is 9600; that should be safe.
ttyUSB0<*1>: ATQ0 V1 E1 S0=0 &C1 &D2 +FCLASS=0 -- OK
WvModem<*1>: Cannot get information for serial port.
ttyUSB1<*1>: ATQ0 V1 E1 -- failed with 2400 baud, next try: 9600 baud
ttyUSB1<*1>: ATQ0 V1 E1 -- failed with 9600 baud, next try: 9600 baud
ttyUSB1<*1>: ATQ0 V1 E1 -- and failed too at 115200, giving up.
WvModem<*1>: Cannot get information for serial port.
ttyUSB2<*1>: ATQ0 V1 E1 -- OK
ttyUSB2<*1>: ATQ0 V1 E1 Z -- OK
ttyUSB2<*1>: ATQ0 V1 E1 S0=0 -- OK
ttyUSB2<*1>: ATQ0 V1 E1 S0=0 &C1 -- OK
ttyUSB2<*1>: ATQ0 V1 E1 S0=0 &C1 &D2 -- OK
ttyUSB2<*1>: ATQ0 V1 E1 S0=0 &C1 &D2 +FCLASS=0 -- OK
ttyUSB2<*1>: Modem Identifier: ATI -- Manufacturer: +GMI: HUAWEI TECHNOLOGIES CO., LTD
ttyUSB2<*1>: Speed 9600: AT -- OK
ttyUSB2<*1>: Max speed is 9600; that should be safe.
ttyUSB2<*1>: ATQ0 V1 E1 S0=0 &C1 &D2 +FCLASS=0 -- OK

Found a modem on /dev/ttyUSB0.
Modem configuration written to /etc/wvdial.conf.
ttyUSB0: Speed 9600; init "ATQ0 V1 E1 S0=0 &C1 &D2 +FCLASS=0"
ttyUSB2: Speed 9600; init "ATQ0 V1 E1 S0=0 &C1 &D2 +FCLASS=0"
3. update "/etc/wvdial.conf"
[Dialer Defaults]
Init1 = ATZ
Init2 = ATQ0 V1 E1 S0=0 &C1 &D2 +FCLASS=0
Modem Type = Analog Modem
; Phone =
ISDN = 0
; Password =
; Username =
Phone = #777
Modem = /dev/ttyUSB0
Username = 93XXXXXXXX
Password = 93XXXXXXXX
Baud = 9600
4. run the command "wvdial"
$ sudo wvdial
--> WvDial: Internet dialer version 1.61
--> Cannot get information for serial port.
--> Initializing modem.
--> Sending: ATZ
ATZ
OK
--> Sending: ATQ0 V1 E1 S0=0 &C1 &D2 +FCLASS=0
ATQ0 V1 E1 S0=0 &C1 &D2 +FCLASS=0
OK
--> Modem initialized.
--> Sending: ATDT#777
--> Waiting for carrier.
ATDT#777
CONNECT
--> Carrier detected.  Waiting for prompt.
^DSDORMANT:1
--> Don't know what to do!  Starting pppd and hoping for the best.
--> Starting pppd at Sat Aug 21 14:24:31 2010
--> Pid of pppd: 16220
--> Using interface ppp0
--> pppd: @�:[08]��:[08]
--> pppd: @�:[08]��:[08]
--> pppd: @�:[08]��:[08]
--> local  IP address 115.XXX.XXX.XXX
--> pppd: @�:[08]��:[08]
--> remote IP address 220.XXX.XXX.XXX
--> pppd: @�:[08]��:[08]
--> primary   DNS address 202.XXX.XXX.XXX
--> pppd: @�:[08]��:[08]
--> secondary DNS address 202.XXX.XXX.XXX
--> pppd: @�:[08]��:[08]
5. update "/etc/resolv.con"
nameserver 202.XXX.XXX.XXX
reference:
http://www.gnulinux.in/blog/my-user-experience-reliance-netconnect-broadband-service-and-ubuntu-904
How to Resize Windows Taskbar
How to move the Windows taskbar,
==> Right-click on a blank area in the taskbar and deselect "Lock the Toolbar". A divider line should appear next to the Start button.
==> Left-click the area between the Start button and your divider.
==> While keeping the left mouse button pressed, drag the taskbar to the new location. (top, bottom, left or right)
==> Release your mouse.
==> Right-click any blank area and Lock the Toolbar.
05 August 2010
Map a Drive Letter to a Local Folder
Download Windows Drive add script from here.
Reference:
http://code.google.com/p/psubst
http://www.howtogeek.com/howto/windows-vista/map-a-drive-letter-to-a-folder-the-easy-way-in-windows
http://www.windowsitpro.com/article/tips/jsi-tip-9375-how-can-i-create-a-drive-letter-for-a-local-folder-and-have-it-available-to-all-users-.aspx
ren MyDL.sh MyDL.bator
MyDL Z: c:\Windows
subst Z: C:\Windows
set key="HKLM\SYSTEM\CurrentControlSet\Control\Session Manager\DOS Devices"
set DRV="Z:"
set FP="C:\Windows"
reg ADD %key% /V %DRV% /T REG_SZ /F /D "\??\\%FP%"
subst Z: C:\Windows
Reference:
http://code.google.com/p/psubst
http://www.howtogeek.com/howto/windows-vista/map-a-drive-letter-to-a-folder-the-easy-way-in-windows
http://www.windowsitpro.com/article/tips/jsi-tip-9375-how-can-i-create-a-drive-letter-for-a-local-folder-and-have-it-available-to-all-users-.aspx
29 July 2010
howto create bootable CDROM in linux
Download BusyBox from here.
Download BusyBox config file from here.
Download ISO build script from here.
Make sure Linux has he following configs enabled:
Test "grub.iso" in VmWare:
Reference:
http://tldp.org/HOWTO/Bootdisk-HOWTO/cd-roms.html
http://www.yolinux.com/TUTORIALS/LinuxTutorialCDBurn.html
http://linuxtuneup.blogspot.com/2006/01/slipstreaming-windows-cd-under-linux.html
http://odin.himinbi.org/xp_cds/eltorito_extraction.html
http://alinux.tv/Kernel-2.6.34/initrd.txt
http://en.gentoo-wiki.com/wiki/Initramfs
Download BusyBox config file from here.
Download ISO build script from here.
Make sure Linux has he following configs enabled:
CONFIG_BLK_DEV_INITRD=y
CONFIG_INITRAMFS_SOURCE=""

CONFIG_BLK_DEV_RAM=y
CONFIG_BLK_DEV_RAM_COUNT=16
CONFIG_BLK_DEV_RAM_SIZE=4096
# chmod +x script.sh
# ./script.sh
untarring busybox...OK
making busybox...OK
making initrd...OK
crreating iso image...OK
making ISO image (grub.iso)...OK
Test "grub.iso" in VmWare:
RAMDISK: gzip image found at block 0
EXT4-fs (ram0): mounted filesystem without journal
VFS: Mounted root (ext2 filesystem) readonly on device 1:0
Freeing unused kernel memory: 276k freed

BusyBox v1.17.1 (2010-08-03 19:24:37 IST) built-in shell (ash)
Enter 'help' for a list of build-in commands.

/bin/sh: can't access tty: job control turned off
#
Reference:
http://tldp.org/HOWTO/Bootdisk-HOWTO/cd-roms.html
http://www.yolinux.com/TUTORIALS/LinuxTutorialCDBurn.html
http://linuxtuneup.blogspot.com/2006/01/slipstreaming-windows-cd-under-linux.html
http://odin.himinbi.org/xp_cds/eltorito_extraction.html
http://alinux.tv/Kernel-2.6.34/initrd.txt
http://en.gentoo-wiki.com/wiki/Initramfs
28 July 2010
findout name and ip of machines in the network
Download latest version of WinPcap from here (1.4.2).
Download latest version of namp from here (1.2.9).
Reference:
http://nmap.org
http://www.winpcap.org
http://www.petri.co.il/quickly_find_used_ip_addresses.htm
Download latest version of namp from here (1.2.9).
C:\>nmap -sP 192.168.10.0/24

Nmap scan report for 192.168.10.1
Host is up (0.041s latency).
MAC Address: 00:24:01:XX:YY:ZZ (D-Link)

Nmap scan report for 192.168.10.100
Host is up (0.047s latency).
MAC Address: 00:1F:3B:XX:YY:ZZ (Intel Corporate)

Nmap scan report for 192.168.10.101
Host is up.
--> ME

Nmap scan report for 192.168.10.102
Host is up (0.078s latency).
MAC Address: 00:1C:DF:XX:YY:ZZ (Belkin International)

Nmap scan report for 192.168.10.104
Host is up (0.00s latency).
MAC Address: 00:19:D2:XX:YY:ZZ (Intel)

Nmap done: 256 IP addresses (5 hosts up) scanned in 4.94 seconds
This command took almost 15-20 min

FOR /L %i IN (1,1,254) DO ping -n 1 192.168.10.%i | FIND /i "Reply">> c:\ipaddr.txt
 Reply from 192.168.10.1: bytes=32 time=2ms TTL=64
 Reply from 192.168.10.101: bytes=32 time<1ms TTL=128
 Reply from 192.168.10.102: bytes=32 time=3ms TTL=128
Reference:
http://nmap.org
http://www.winpcap.org
http://www.petri.co.il/quickly_find_used_ip_addresses.htm
automate switch commands for Nortel Baystack
download the perl script loop.pl
Reference:
http://cosimo.europe.nortel.com/Scripts/acg.pl/acg.pl
# yum install perl-Net-Telnet
# chmod +x loop.pl
# ./loop.pl <switch IP Address>
loop.pl version 1.0.0; running on linux; perl version 5.008008
Connecting with Telnet to...........OK
sysUpTime: 31 days, 21:49:32
sysUpTime: 31 days, 21:49:39
sysUpTime: 31 days, 21:49:46
sysUpTime: 31 days, 21:49:53
sysUpTime: 31 days, 21:50:00
sysUpTime: 31 days, 21:50:07
sysUpTime: 31 days, 21:50:14
sysUpTime: 31 days, 21:50:21
sysUpTime: 31 days, 21:50:28
sysUpTime: 31 days, 21:50:35
Reference:
http://cosimo.europe.nortel.com/Scripts/acg.pl/acg.pl
23 July 2010
create a ramfs in VxWorks
In Linux:
In VxWorks:
Reference:
http://www.thegeekstuff.com/2008/11/overview-of-ramfs-and-tmpfs-on-linux
http://www.vanemery.com/Linux/Ramdisk/ramdisk.html
http://www.fys.uio.no/studier/kurs/fys4220/docs/vxworks/guide/index.html
http://www.fys.uio.no/studier/kurs/fys4220/docs/vxworks/guide/c-iosys7.html
# mkdir -p /mnt/tmp
# mount -t tmpfs -o size=20m tmpfs /mnt/tmp
# mount
  tmpfs on /mnt/tmp type tmpfs (rw,size=20m)

# df -h
  tmpfs                  20M     0   20M   0% /mnt/tmp
# dd if=/dev/zero of=/mnt/tmp/file bs=1024 count=1024
# df -h
  tmpfs                  20M  1.1M   19M   6% /mnt/tmp
# mkfs -t ext3 -L "RamDisk 1" /dev/ram0

# mkdir -p /mnt/rd
# mount /dev/ram0 /mnt/rd -t ext3
# mount
  /dev/ram0 on /mnt/rd type ext3 (rw)

# df -h
  /dev/ram0             3.9M  1.1M  2.7M  29% /mnt/rd
# dd if=/dev/zero of=/mnt/rd/file bs=1024 count=1024
# df -h
  /dev/ram0             3.9M  2.1M  1.7M  56% /mnt/rd
In VxWorks:
I hate VxWorks
Reference:
http://www.thegeekstuff.com/2008/11/overview-of-ramfs-and-tmpfs-on-linux
http://www.vanemery.com/Linux/Ramdisk/ramdisk.html
http://www.fys.uio.no/studier/kurs/fys4220/docs/vxworks/guide/index.html
http://www.fys.uio.no/studier/kurs/fys4220/docs/vxworks/guide/c-iosys7.html
encrypt/decrypt with openssl
# echo "hi there" > test
# openssl aes-128-cbc -in test -base64 -k password
  U2FsdGVkX18mc7Sq6Q3CqPVbNe3Kp7Pyqr2sDo7rQTE=

# openssl aes-128-cbc -in test -base64 -k password > test.enc
# openssl enc -d -in test.enc -k password
  U2FsdGVkX18z0h1BxcQtiQ7Fq7xKnabTC8fZnmw1bOE=

# openssl aes-128-cbc -d -in test.enc -k password -base64
  hi there
# echo -n "" | md5sum
  d41d8cd98f00b204e9800998ecf8427e
# echo -n "hi there" | md5sum
  fd33e2e8ad3cb1bdd3ea8f5633fcf5c7
Reference:
http://www.cs.colorado.edu/~jrblack/class/csci6268/f05/slides/CSCI6268L12.ppt
http://www.mydigitallife.info/2008/12/10/how-to-calculate-and-generate-md5-hash-value-in-linux-and-unix-with-md5sum
20 July 2010
mount baystack binary config file
Download baystack binary config file from here.
Reference:
http://www.c-jump.com/CIS24/Slides/FAT/lecture.html
# hexdump baystack.bin -C -n 1024
00000000  00 01 00 00 00 01 00 00  00 00 00 00 00 00 00 00  |................|
00000010  00 00 00 00 00 00 41 41  00 30 00 00 01 00 00 0b  |......AA.0......|
00000020  00 30 00 0f 00 10 00 04  35 2e 30 2e 32 2e 30 33  |.0......5.0.2.03|
00000030  33 00 00 00 00 00 00 00  00 00 00 00 00 00 00 00  |3...............|
00000040  00 00 00 00 00 00 00 00  00 00 00 00 00 00 00 00  |................|
*
00000070  00 00 00 00 00 00 00 00  00 00 c3 37 a3 f3 eb 3e  |...........7...>|
00000080  90 56 58 44 4f 53 31 32  00 00 02 01 01 00 02 70  |.VXDOS12.......p|
00000090  00 00 08 f9 06 00 11 00  01 00 00 00 00 00 00 00  |................|
000000a0  00 00 00 00 29 ff ff ff  ff 00 00 00 00 00 00 00  |....)...........|
000000b0  00 00 00 00 46 41 54 31  32 20 20 20 00 00 00 00  |....FAT12   ....|
000000c0  00 00 00 00 00 00 00 00  00 00 00 00 00 00 00 00  |................|
*
00000270  00 00 00 00 00 00 00 00  00 00 00 00 55 aa f9 ff  |............U...|
00000280  ff ff 9f 09 ff 6f 00 ff  ff ff ff ff 04 ff ff ff  |.....o..........|
00000290  0d f0 ff ff 0f 01 11 20  01 13 40 01 15 60 01 17  |....... ..@..`..|
000002a0  80 01 19 a0 01 1b c0 01  1d e0 01 1f 00 02 21 20  |..............! |
# dd if=baystack.bin of=msdos.img bs=1 skip=126
# mkdir mnt
# mount msdos.img mnt/ -o loop
# ls mnt/
a_inspct.nvr  clfrdata.qpa  gblCfg.nvr    ipt_ping      password.nvr
qctempl.cfg   softlic       telCfg.nvr    apps          def_cmd.nvr
ifcmap.qpa    l3dhcpr.nvr   pdtCfg.nvr    quickset.cfg  staticrt.cfg
usbcfg.nvr    asc_cfg       d_snoop.nvr   igmp.nvr      l3mgr.nvr
plcycomp.qpa  qVlan         stpcfg2.nvr   buttonui.nvr  eap_enh.nvr
ipmgrcfg.nvr  mltScfgS.nvr  pmtCfg.nvr    rtccfg.nvr    stpcfg.nvr
cfgfile.nvr   eap.nvr       ipt_cfg       neap.nvr      polcfg.nvr
snmpv3        syslog
Reference:
http://www.c-jump.com/CIS24/Slides/FAT/lecture.html
10 July 2010
SerDes
Some of the standard interface used to connect MAC-block to a PHY chip are AUI, MII, GMII, and XAUI.
AUI : Attachment Unit Interface (for 10 megabit Ethernet)
MII : Medium Independent Interface, 4bit wide data path (for 100 megabit Ethernet)
GMII : Gigabit MII, 8bit wide data path (25 pin parallel) (for gigabit Ethernet)
-> RGMII : Reduced Gigabit MII (12 pin parrallel)
-> SGMII : Serial Gigabit MII (4 pins per port)
XAUI : A 10G AUI (for 10 gigabit Ethernet).
A SERDES (serializer/deserializer) transceiver converts parallel data to/from serial data, thereby reducing the number of signals needed in a chip to chip interface.
The System Packet Interface Level 4 Phase 2 (SPI4.2) is a high-speed interconnection for 10Gbps aggregate bandwidth applications.
NPI - PCI target Network Packet Interface.
Reference:
http://pinouts.ru/Net/mii_pinout.shtml
http://40gethernet.wordpress.com/2009/05/08/overview-of-the-xaui-xlaui-and-caui-part1/
http://www.commsdesign.com/design_corner/showArticle.jhtml?articleID=16505086
http://www.latticesemi.com/products/intellectualproperty/referencedesigns/xauihigighigigtospi4x2s4b/index.cfm
http://opencores.org/project,smii
28 June 2010
multi-boot in embedded device
My device have U-Boot boot loader and 64MB cavium-nand flash (for "kernel" and "filesystem"). How can i support dual-boot in it???
I have decided to format the NAND flash like this:
Solution:
Ideal U-Boot parameters:
Reference:
I have decided to format the NAND flash like this:
/dev/mtd0 : 0x00000000-0x00300000 : 3 MB : "kernel1"And made device soft link like:
/dev/mtd1 : 0x00300000-0x01300000 : 16 MB : "cramfs1"
/dev/mtdblock2 : 0x01300000-0x01700000 : 4 MB : "jffs2"
/dev/mtdblock3 : 0x01700000-0x01800000 : 1 MB : "nvram"
/dev/mtd4 : 0x01800000-0x01b00000 : 3 MB : "kernel2"
/dev/mtd5 : 0x01b00000-0x02b00000 : 16 MB : "cramfs2"
/dev/mtd-kernel -> mtd0How does U-Boot does the boot process:
/dev/mtd-rfs -> mtd1
/dev/mtd-kernel-alt -> mtd4
/dev/mtd-rfs-alt -> mtd5
1. Read kernel from NAND to RAM
2. un-compress the kernel to RAM
3. execute kernel

Ex:-
bootcmd=nand read <TO> <FROM> <SIZE>; \
        gunzip <FROM> <SIZE> <TO> <MAX SIZE>; \
        bootoctlinux <NEW FROM> root=/dev/mtdblock1 ${mtdparts}

bootcmd=nand read 0x500000 0x00000 0x300000; \
        gunzip 0x500000 0x300000 0x2800000 0xf00000; \
        bootoctlinux 0x2800000 root=/dev/mtdblock1 ${mtdparts}
Solution:
1. get the current kernel information from U-Boot parameter
2. burnel kernel image in alternate locations (mtd0, mtd5)
3. update U-Boot parameter
Ideal U-Boot parameters:
bootcmd=run boot1firmware upgrade script:
altbootcmd=run boot2
boot1=namedfree __tmp_reserved_bootloader; \
nand read 500000 00000 300000; \
run boot11
boot2=namedfree __tmp_reserved_bootloader; \
nand read 500000 1800000 300000; \
run boot21
mtdparts=mtdparts=cavium-nand:3072k(kernel1),16384k(cramfs1), \
4096k(jffs2),1024k(nvram), \
3072k(kernel2),16384k(cramfs2),3072k()
boot11=gunzip 0x500000 300000 0x2800000 0xf00000; \
bootoctlinux 2800000 root=/dev/mtdblock1 ${mtdparts}
boot21=gunzip 0x500000 300000 0x2800000 0xf00000; \
bootoctlinux 2800000 root=/dev/mtdblock5 ${mtdparts}
#!/bin/sh

bootcmd=`bootenv -d bootcmd`
altcmd=`bootenv -d altbootcmd`

if [ "$bootcmd" == "run boot1" ];
then
    kernelimage="/dev/mtd-kernel-alt"
    rfsimage="/dev/mtd-rfs-alt"
else
    kernelimage="/dev/mtd-kernel"
    rfsimage="/dev/mtd-rfs"
fi

# Kernel in mtd-kernel
echo "Erasing the kernel image in $kernelimage"
echo -n "Flashing in the new kernel image. Please wait..."

# Root File System in mtd-rfs
echo "Erasing the root f/s image in $rfsimage"
echo -n "Flashing in the new root f/s image. Please wait..."

if [ "$bootcmd" == "run boot1" ];
then
    echo "Setting new bootcmd as run boot2 and backup as run boot1"
    bootenv -s bootver "$upgradeVersion"
    bootenv -s bootcmd "run boot2"
    bootenv -s altbootver "$existingVersion"
    bootenv -s altbootcmd "run boot1"
else
    echo "Setting new bootcmd as run boot1 and backup as run boot2"
    bootenv -s bootver "$upgradeVersion"
    bootenv -s bootcmd "run boot1"
    bootenv -s altbootver "$existingVersion"
    bootenv -s altbootcmd "run boot2"
fi

/bin/sync
/bin/sleep 2

# Reboot
exec /sbin/init -r
Reference:
13 June 2010
How To: Add Subtitles to your PS3 Movies
The types of video formats supported by PS3 are MPEG-1, MPEG-2, MP4, AVI, DivX, WMV etc.
There are two such subtitle formats that can be used
1. The XSUB format - where the generated bitmaps are presented as an additional stream inserted in the video file itself. This works only with avi files. In this case another avi is generated that has the subtitles incorporated.
2. The idx/sub format - This format uses a pair of files, one with extension idx and another with extension sub. These files go together and replace the srt in your player.
AVIAddXSubs takes an AVI with XVID/DIVX content plus SRT/IDX/SUB files and merges them into a DIVX container (XSUB) which is what the PS3 supports. PS3 from firmware version 2.2 supports XSUB subtitles.

Reference:
http://www.calcitapp.com/AVIAddXSubs.php
http://dontcthis.com/2009/09/how-to-add-subtitles-to-your-ps3-movies
http://manuals.playstation.net/document/en/ps3/3_15/video/filetypes.html
08 June 2010
Equal Cost Multipath (ECMP) routing
In Nortel BayStack switches ECMP requires separate license. So that does it provide extra???
Many of today's businesses measure network downtime in millions of dollars per minute. With ECMP, network managers can increase the capacity of backbone trunks and virtually eliminate network downtime.
This routing mechanism enables packet routing along multiple paths with equal cost and ensures load balancing. With ECMP, a new gateway is chosen for each new source/destination IP pair. For example, one FTP connection will use only one link, but new connection to a different server will use another link.
--> The ECMP routes can be created by routing protocols (RIP or OSPF), or by adding a static route with multiple gateways.
--> The ECMP routes can be created by adding a static route with multiple gateways.
In BayStack, ECMP allows up to 4 paths to pass traffic simultaneously.
Reference:
http://www.mikrotik.com/testdocs/ros/2.9/ip/route.php
http://www.networkaccess.ru/catalogue/Network_equipment/switches/nortel
Many of today's businesses measure network downtime in millions of dollars per minute. With ECMP, network managers can increase the capacity of backbone trunks and virtually eliminate network downtime.
This routing mechanism enables packet routing along multiple paths with equal cost and ensures load balancing. With ECMP, a new gateway is chosen for each new source/destination IP pair. For example, one FTP connection will use only one link, but new connection to a different server will use another link.
--> The ECMP routes can be created by routing protocols (RIP or OSPF), or by adding a static route with multiple gateways.
--> The ECMP routes can be created by adding a static route with multiple gateways.
In BayStack, ECMP allows up to 4 paths to pass traffic simultaneously.
5650TD#show ip route
=========================================================
                                        Ip Route
=========================================================
DST             MASK            NEXT            COST TYPE
---------------------------------------------------------
0.0.0.0         0.0.0.0         47.152.228.1    10   IB
47.152.228.0    255.255.255.0   47.152.228.226  1    DB
Total Routes: 2
----------------------------------------------------------
TYPE Legend:
I=Indirect Route, D=Direct Route, A=Alternative Route, B=
Best Route, E=Ecmp Route, U=Unresolved Route, N=Not in HW

5650TD(config)# maximum-path 2
Access not granted.
Contact support@nortel.com to update Software license.

5650TD(config)# ip route 0.0.0.0 0.0.0.0 47.152.228.254 10
% Cannot modify settings
% ECMP: Maximum allowed IP paths already reached
Reference:
http://www.mikrotik.com/testdocs/ros/2.9/ip/route.php
http://www.networkaccess.ru/catalogue/Network_equipment/switches/nortel
07 June 2010
Proxy Auto-Detect, how does it affect YM???
Recently i had an issue with Yahoo Messenger, the login was failing all the time and troubleshoot give the following error.
Reference:
http://blog.freyguy.com/archives/2006/03/01/proxy-auto-detect-ie-and-firefox
http://www.grape-info.com/doc/win2000srv/internet-gw/wpad/index.html
Checking virtual IP servers...
[VIP Raw] Resolving host name us1.proxy.mycomp.com... [PASSED]
[VIP Raw] Connecting to Virtual IP server 75.X.Y.Z... [FAILED]
 ***  'COMPONENT_TYPE_WININET' value: '12017' ***
[VIP Raw] Connecting to Virtual IP server 75.X.Y.Z...
[VIP Raw] Connecting to Virtual IP server 75.X.Y.Z... [FAILED]
 ***  'COMPONENT_TYPE_WININET' value: '12017' ***
[VIP Raw] Connecting to Virtual IP server 75.X.Y.Z... [FAILED]
 ***  'COMPONENT_TYPE_WININET' value: '12017' ***
[VIP Raw] FAILED
 ***  'COMPONENT_TYPE_YCP' YCPError: 'YMSG.ColoSelectionTimeout' ***
IE8 -> Tools -> Internet Options -> Connections ->
LAN Settings -> Automatically detect settings (uncheck it)
# nslookup wpad
   Name: wpad.mycomp.com
   Address: 79.X1.Y1.Z1
# http://wpad/wpad.dat
  --> return "PROXY us1.proxy.mycomp.com:8000;";
# The proxy server redirects all HTTP req to auth page

# The same was happening to YM and hence the issue.
# It seems IE, Chrome and YM are sharing same configuration.
# what the ..ck???
Reference:
http://blog.freyguy.com/archives/2006/03/01/proxy-auto-detect-ie-and-firefox
http://www.grape-info.com/doc/win2000srv/internet-gw/wpad/index.html
12 May 2010
07 May 2010
How To: Setup SSH/SCP without a password
If you want to ssh from homebox to servermachine with out prompting for password pls go through the rest.
From Linux machine
From Windows machine
Reference:
http://www.hostingrails.com/HowTo-SSH-SCP-without-a-password
From Linux machine
[humblejo@homebox .ssh]$
 Generate public/private dsa key pair
 ssh-keygen -t dsa
 chmod 600 id_dsa id_dsa.pub
 scp id_dsa.pub root@servermachine:/root/.ssh/tmpkey

[root@servermachine .ssh]#
 cat tmpkey >> authorized_keys

[humblejo@homebox ~]$
 ssh root@servermachine
 ssh login without password is done...
From Windows machine
1. Download windows SSH client package PuTTY 0.60 from here

2. use puttygen.exe to generate public/private dsa key pair
2.a. Type of key to generate: SSH-2 DSA
2.b. Number of bits in a generated key: 1024

3. save private key without passphrase protection
4. Add pagent.exe on startup and add host private key on it

5. Add public key in the server machine
5.a. [root@servermachine ~]#
     ssh-keygen -i -f tmpkey >> /root/.ssh/authorized_keys

6. PuTTY configuration -> Connection -> Data
   --> Auto-login user name ==> "root"
Reference:
http://www.hostingrails.com/HowTo-SSH-SCP-without-a-password
06 May 2010
enable clipboard tranfer in linux vncserver
Being not able to copy/paste from linux machine through vncviewer was bugging me for a couple of day :(
Here is the solution:
reference:
http://linux.die.net/man/1/vncconfig
http://www.realvnc.com/products/free/4.1/man/vncserver.html
Here is the solution:
vncconfig -nowin &step to kill a running vncserver:
done...
vi ~/.vnc/xstartup
>>> vncconfig -nowin &
restart the linux machine...
cat ~/.vnc/hostname.4.pid

vncserver -kill :4
done...
reference:
http://linux.die.net/man/1/vncconfig
http://www.realvnc.com/products/free/4.1/man/vncserver.html
27 April 2010
How to: Setup a time server in linux
Configaration on NTP server (Linux machine)
check with "ntpq -p" the output should be like this:
make sure "*LOCAL(0)" is there ("*" is important here).
Configuration on NTP client (Windows machine)
Other configuration commands on NTP Client (windows machine)
Configuration on NTP client (Linux machine)
Reference:
Introduction to NTP
Another blog - an help for NTP server configuration
http://www.tuxweb.net/howto/ntp/network_time_howto.html
http://www.meinberg.de/english/info/ntp.htm
http://support.ntp.org/bin/view/Servers/WebHome
The_NTP_Server
sntp.pl
cat > /etc/ntp.conf << EOFwait for around 20 min for NTP server to initialize
server 0.pool.ntp.org
server 1.pool.ntp.org
server 127.127.1.0 # local clock
fudge 127.127.1.0 stratum 12
restrict default ignore
restrict 0.pool.ntp.org nomodify notrap noquery
restrict 1.pool.ntp.org nomodify notrap noquery
restrict 192.168.0.0 mask 255.255.0.0 nomodify notrap
restrict 127.0.0.1
driftfile /var/lib/ntp/drift
EOF
yum install ntp
ntpdate -b pool.ntp.org
chkconfig --level 2345 ntpd on
service ntpd restart
check with "ntpq -p" the output should be like this:
make sure "*LOCAL(0)" is there ("*" is important here).
# ntpq -p
     remote           refid      st t when poll reach   delay   offset  jitter
==============================================================================
 adelaide.ip4.ph .INIT.          16 u    -   64    0    0.000    0.000   0.000
 ox.eicat.ca     .INIT.          16 u    -   64    0    0.000    0.000   0.000
*LOCAL(0)        .LOCL.          12 l   14   64  377    0.000    0.000   0.001
Configuration on NTP client (Windows machine)
net stop w32time && net start w32time
w32tm /config /manualpeerlist:192.168.0.105 /syncfromflags:manual /update
w32tm /resync /rediscover
Other configuration commands on NTP Client (windows machine)
w32tm /config /syncfromflags:domhier /update
w32tm /resync /rediscover

w32tm /stripchart /computer:192.168.0.105 /samples:3 /dataonly
w32tm /monitor /computers:192.168.0.105
Configuration on NTP client (Linux machine)
ntpdate 192.168.0.105Configure SNTP client on Nortel switch
service ntpd stop
ntpdate 0.pool.ntp.org
(config)# clock time-zone IST +5 30
(config)# clock source sntp

(config)# sntp server primary address 192.168.0.105
(config)# sntp enable

(config)# show clock
    Current SNTP time  :    2010-04-27 20:30:26 GMT+05:30
    Daylight saving time is DISABLED
    Time zone is set to 'IST', offset from UTC is 05:30
Reference:
Introduction to NTP
Another blog - an help for NTP server configuration
http://www.tuxweb.net/howto/ntp/network_time_howto.html
http://www.meinberg.de/english/info/ntp.htm
http://support.ntp.org/bin/view/Servers/WebHome
The_NTP_Server
sntp.pl
24 April 2010
lldp in Nortel switches
SynOptics Network Management Protocol (SONMP) --> Bay Network Management Protocol (BNMP) or Bay Discovery Protocol (BDP) --> Nortel Discovery Protocol (NDP)
Nortel switch 425 and 55x0 series support LLDP with a 5.x firmware.
LLDP-MED (Media Endpoint Discovery) is an enhancement of LLDP.
Sample LLDP packets captured are: lldp.minimal.pcap, lldp.detailed.pcap, lldpmed_civicloc.pcap
Steps to install LLDP agent in a Linux machine:
download lldp demon from here.
Reference:
https://trac.luffy.cx/lldpd/wiki/CompatibleHardware#SONMP
https://trac.luffy.cx/lldpd/wiki/CompatibleHardware#Nortel
http://wiki.wireshark.org/SampleCaptures
Nortel switch 425 and 55x0 series support LLDP with a 5.x firmware.
show lldp neighborsSONMP is supported only on Nortel switches and routers and is enabled by default. The Network Management Module table shows the slot number and port number of the remote device used to send out the topology packet.
show autotopology nmm-tableLLDP frames are sent by equipments on each port at a fixed frequency.
LLDP-MED (Media Endpoint Discovery) is an enhancement of LLDP.
Sample LLDP packets captured are: lldp.minimal.pcap, lldp.detailed.pcap, lldpmed_civicloc.pcap
Steps to install LLDP agent in a Linux machine:
download lldp demon from here.
./configure
make
make install

mkdir /var/run/lldpd
useradd _lldpd

lldpd
# lldpctlThis means eth0 of the current linux machine is connected to the port 15 of the switch with mac address AA:BB:CC:DD:EE:00.
LLDP neighbors:
Interface: eth0, via: LLDP, RID: 1, Time: 0 day, 19:20:38
Chassis:
ChassisID: mac AA:BB:CC:DD:EE:00
SysName: Not received
SysDescr: Not received
Port:
PortID: mac AA:BB:CC:DD:EE:15
PortDescr: Not received
Reference:
https://trac.luffy.cx/lldpd/wiki/CompatibleHardware#SONMP
https://trac.luffy.cx/lldpd/wiki/CompatibleHardware#Nortel
http://wiki.wireshark.org/SampleCaptures
customised ethtool
download customised ethtool.c from here.
Reference:
ethtool.c
netdrv_ethtool.c
# ./ethtool eth0
driver: pcnet32
version: 1.35
firmware-version:
bus-info: 0000:00:11.0
Reference:
ethtool.c
netdrv_ethtool.c
18 April 2010
AVL Tree
an AVL tree is a self-balancing binary search tree.
Lookup, insertion, and deletion all take O(log n).
The balance factor of a node is the height of its left subtree minus the height of its right subtree.
A node with balance factor 1, 0, or −1 is considered balanced.
a. Right rotation:
i. Left Rotaion at 30:
Reference:
www.cs.virginia.edu/~cs216/Fall2005/notes/avl_handout.pdf
http://cis.stvincent.edu/carlsond/swdesign/avltrees/avltrees.html
http://www.cs.uiuc.edu/class/fa05/cs400/_resources/_practice/avlsoln.html
http://cprogramminglanguage.net/avl-tree.aspx
Lookup, insertion, and deletion all take O(log n).
The balance factor of a node is the height of its left subtree minus the height of its right subtree.
A node with balance factor 1, 0, or −1 is considered balanced.
a. Right rotation:
-2 -1b. Double Rotation:
80 80
/ \ / \
-2 -1 0 -1
30 100 15 100
/ \ / / \ /
-1 0 0 -1 0 0
15 40 90 ==> 10 30 90
/ \ / / \
-1 0 0 0 0
10 20 5 20 40
/
0
5
i. Left Rotaion at 30:
-2 -2ii. Right Rotation at 80:
80 80
/ \ / \
+1 0 -1 0
30 100 50 100
/ \ / \ / \ / \
-1 +1 0 0 -1 -1 0 0
20 50 90 120 30 60 90 120
/ / \ / \ /
0 0 -1 -1 0 0
10 40 60 20 40 55
/ /
0 0
55 10
                -2                            0
                80                           50
            /        \                   /        \
         -1             0             -1             0
         50            100            30            80
       /   \         /     \        /   \         /     \
    -1      -1      0       0     -1     0      -1       0
    30      60     90      120    20     40     60      100
   /  \    /                     /             /       /   \
  -1   0  0                     0             0       0     0
  20  40  55                   10             55      90   120
 /
0
10
ALV Implemention File - avltree.c
AVL Tree Header File - avltree.h
Macro for Fatal Error - fatal.h
Test Program for AVL Tree - testavl.c
Makefile - Makefile
Reference:
www.cs.virginia.edu/~cs216/Fall2005/notes/avl_handout.pdf
http://cis.stvincent.edu/carlsond/swdesign/avltrees/avltrees.html
http://www.cs.uiuc.edu/class/fa05/cs400/_resources/_practice/avlsoln.html
http://cprogramminglanguage.net/avl-tree.aspx
12 April 2010
How To: Setup A Linux Syslog Server
redirect all dhcp messages to /var/log/boot.log
redirect all other messages to /var/log/messages
snmptrapd is listening on udp port 162
syslogd is listening on udp port 514
find the process name who is using port 162:
configure syslog and snmptrap in baystack
configure syslog and snmptrap in WC-8180
configure SNMP Trap Server:
send fake SNMP Trap to SNMP Trap Server:
Reference:
http://www.linuxhomenetworking.com/wiki/index.php/Quick_HOWTO_:_Ch05_:_Troubleshooting_Linux_with_syslog
http://docstore.mik.ua/orelly/networking_2ndEd/snmp/ch10_03.htm
http://www.rekk.de/bloggy/2007/find-process-id-by-port-number
redirect all other messages to /var/log/messages
snmptrapd is listening on udp port 162
syslogd is listening on udp port 514
--> /etc/dhcpd.conf
>>> log-facility local7;

--> /etc/syslog.conf
>>> *.info;mail.none;authpriv.none;cron.none;local7.none \
        /var/log/messages
>>>local7.*  /var/log/boot.log

--> /etc/sysconfig/syslog
>>> SYSLOGD_OPTIONS="-m 0 -r"

# service dhcpd restart
# service syslog restart
# tail -f /var/log/messages
find the process name who is using port 162:
netstat -nlp | grep ":162"
netstat -nlp | awk '/:162 / {split($6,t,"/"); print t[2]}'
@echo off

for /F "usebackq tokens=4" %%f in (`netstat -ano ^| find ":%1"`) do call :process %%f
for /F "usebackq tokens=5" %%f in (`netstat -ano ^| find ":%1"`) do call :process %%f
goto :eof

:process
tasklist /FI "PID eq %1" /NH
configure syslog and snmptrap in baystack
(config)# logging remote address 192.168.80.10
(config)# logging remote level critical
(config)# logging remote level serious
(config)# logging remote level informational
(config)# logging remote enable
(config)# show logging config
        Remote Logging: Enabled
        Remote Logging Address: 192.168.80.10
        Event Types To Log Remotely: Critical, Serious, Informational

(config)# snmp-server community public ro
(config)# snmp-server community private rw
(config)# show snmp-server view
(config)# snmp-server community humble read-view nncli \
          write-view nncli notify-view nncli
(config)# show snmp-server community
(config)# snmp-server host 192.168.80.10 v2c humble
(config)# snmp-server enable
configure syslog and snmptrap in WC-8180
WC8180(config)# logging remote address 192.168.80.10
WC8180(config)# logging remote level critical
WC8180(config)# logging remote level serious
WC8180(config)# logging remote level informational
WC8180(config)# logging remote enable
WC8180(config)#show logging system config
Event Logging: Enabled
Volatile Logging Option: Overwrite
Event Types To Log: Critical, Serious, Informational
Event Types To Log To NV Storage: Critical
Remote Logging: Disabled
Remote Logging Address: 192.168.80.10
Secondary Remote Logging Address: 0.0.0.0
Event Types To Log Remotely: Critical, Serious, Informational

WC8180(config)# snmp-server community ro
>> public
WC8180(config)# snmp-server community rw
>> private
WC8180(config)# show snmp-server view
WC8180(config)# snmp-server community read-view nncli \
          write-view nncli notify-view nncli
>> humble
(config)# snmp-server host 192.168.80.10 v2c humble
(config)# snmp-server enable
configure SNMP Trap Server:
--> vi /etc/snmp/snmptrapd.conf
>>> disableAuthorization yes

//snmptrapd -f -Le

service snmptrapd restart
send fake SNMP Trap to SNMP Trap Server:
#!/usr/bin/perl
use SNMP_util "0.54";  # load BER and SNMP_Session

# /usr/lib/perl5/vendor_perl/5.8.8/SNMP_Session.pm
# snmptrap($host, $ent, $agent, $gen, $spec, @vars);
snmptrap("public\@localhost:162", ".1.3.6.1.4.1.2789",
         "192.168.80.115", "6", "3301",
         ".1.3.6.1.4.1.2789.3301.1", "int", "4278475",
         ".1.3.6.1.4.1.2789.3301.2", "string", "DB Stopped");
snmptrap -Ddumph_send,dumpv_send -v 2c -c public \
      localhost:162 3 0 \
      .1.3.6.1.4.1.2789.3301.1 i 4278475 \
      .1.3.6.1.4.1.2789.3301.2 s "DB Stopped"
Reference:
http://www.linuxhomenetworking.com/wiki/index.php/Quick_HOWTO_:_Ch05_:_Troubleshooting_Linux_with_syslog
http://docstore.mik.ua/orelly/networking_2ndEd/snmp/ch10_03.htm
http://www.rekk.de/bloggy/2007/find-process-id-by-port-number
09 April 2010
script to clean linux 2.6.33 for x86
#!/bin/sh

ARCHDIRS="alpha blackfin h8300 m68knommu mn10300 s390 arm \
cris m32r microblaze parisc sh avr32 frv ia64 m68k mips \
powerpc sparc xtensa score"

echo -n "deleting"
for DIR in $ARCHDIRS; do
    echo -n " $DIR"
    rm -rf arch/$DIR
done

echo " Documentation"
rm -rf Documentation

echo ""
echo "creating Documentation Kbuild"
mkdir -p Documentation/DocBook
touch Documentation/Kbuild Documentation/DocBook/Kbuild
Reference:
script-remove-unwanted-folders-from.html
03 April 2010
Payment Systems in India
RTGS - Real Time Gross Settlement
This is the fastest possible money transfer system through the banking channel. The minimum amount to be remitted through RTGS is Rs.1 lakh.
NEFT - National Electronics Funds Transfer
NEFT settlement takes place 6 times a day during the week days (9.00 am, 11.00 am, 12.00 noon. 13.00 hours, 15.00 hours and 17.00 hours) and 3 times during Saturdays (9.00 am, 11.00 am and 12.00 noon).
ECS - Electronic Clearing System
 http://www.visa.com
 http://www.mastercard.com
Visa’s Card Verification Value (CVV / CVV2)
MasterCard’s Card Validation Code (CVC / CVC2)
=> Cardholder Verification is done in a traditional retail environment by reading a card's magnetic stripe with a point-of-sale (POS) terminal and verifiying Visa/Discover's Card Verification Value (CVV) or Mastercard's Card Validation Code (CVC).
=> However, the swipe cannot be validated when the card or a POS reader is not present. The goal of CVN programs are to provide a similar type of verification when the card is not present (online???).
=> The CVN is uniquely associated with the plastic card that is currently issued to the Cardholder. This number is never printed on a receipt or cardholder statement, nor may it be stored in a merchants' computer system. MasterCard refers to the code as CVC2, and Visa as CVV2.
Reference:
http://www.rbi.org.in/SCRIPTs/FAQView.aspx
Payment Systems in India - Vision 2005-08
rbi-plans-new-payment-systems-1
rbi-plans-new-payment-systems-2
Cardholder Verification Number (CVN)
This is the fastest possible money transfer system through the banking channel. The minimum amount to be remitted through RTGS is Rs.1 lakh.
NEFT - National Electronics Funds Transfer
NEFT settlement takes place 6 times a day during the week days (9.00 am, 11.00 am, 12.00 noon. 13.00 hours, 15.00 hours and 17.00 hours) and 3 times during Saturdays (9.00 am, 11.00 am and 12.00 noon).
ECS - Electronic Clearing System
Visa’s Card Verification Value (CVV / CVV2)
MasterCard’s Card Validation Code (CVC / CVC2)
=> Cardholder Verification is done in a traditional retail environment by reading a card's magnetic stripe with a point-of-sale (POS) terminal and verifiying Visa/Discover's Card Verification Value (CVV) or Mastercard's Card Validation Code (CVC).
=> However, the swipe cannot be validated when the card or a POS reader is not present. The goal of CVN programs are to provide a similar type of verification when the card is not present (online???).
=> The CVN is uniquely associated with the plastic card that is currently issued to the Cardholder. This number is never printed on a receipt or cardholder statement, nor may it be stored in a merchants' computer system. MasterCard refers to the code as CVC2, and Visa as CVV2.
Reference:
http://www.rbi.org.in/SCRIPTs/FAQView.aspx
Payment Systems in India - Vision 2005-08
rbi-plans-new-payment-systems-1
rbi-plans-new-payment-systems-2
Cardholder Verification Number (CVN)
24 March 2010
favicon
where its used???
Browsers displays a page's favicon in the browser's address bar, next to the page's name in a list of bookmarks and in tabbed browsing tabs.
how to enable favicon in firefox???
# In the address bar, type about:config
# In the filter box type icon
# Set browser.chrome.favicons to true
# Set browser.chrome.site_icons to true
# Restart Firefox
 www.avaya.com
 www.nortel.com
 www.google.com
 www.iplt20.com
 www.royalchallengers.com
Reference:
http://www.getfavicon.org
http://www.iconsbank.com
http://www.technipages.com/firefox-enabledisable-bookmark-favicons.html
http://blogneedmoney.blogspot.com/2008/02/how-to-change-favicon-in-blogger-blog.html
http://www.mouserunner.com/Spheres_Icons_Index.html
Browsers displays a page's favicon in the browser's address bar, next to the page's name in a list of bookmarks and in tabbed browsing tabs.
how to enable favicon in firefox???
# In the address bar, type about:config
# In the filter box type icon
# Set browser.chrome.favicons to true
# Set browser.chrome.site_icons to true
# Restart Firefox
www.royalchallengers.comReference:
http://www.getfavicon.org
http://www.iconsbank.com
http://www.technipages.com/firefox-enabledisable-bookmark-favicons.html
http://blogneedmoney.blogspot.com/2008/02/how-to-change-favicon-in-blogger-blog.html
http://www.mouserunner.com/Spheres_Icons_Index.html
19 March 2010
15 March 2010
useful Freeware tools for windows
Notepad ++
Vim - Vi IMproved
Win Tail - Tail for Win32
3CDaemon - TFTP, FTP and Syslog server for Win32
Wireshark - network protocol analyzer
Bit-Twist - Ethernet packet generator

bittwist -d
bittwist -i "\Device\NPF_....888}" dhcp.pcap
Sysinternals Suite - Sysinternals single Suite of tools
ZoomIt - utility for zooming and drawing on the screen
TCPView - Active socket command-line viewer
Free Ware:
Sysinternals Utilities Index - http://technet.microsoft.com
CDBurnerXP - burn CDs and DVDs --> http://cdburnerxp.se/download
CCleaner - Optimization and Cleaning --> http://www.piriform.com
Defraggler - File Defragmentation --> http://www.piriform.com
Recuva - File Recovery --> http://www.piriform.com
Speccy - System Information --> http://www.piriform.com
not complete...
13 March 2010
PS3 - FAT32 - 4GB size limit
Problem once i thought cannot be solved, got resolved unexpectedly!!!
Problem:
1. My PS3 was not detecting some portable external HDD
2. The HDD detected by PS3 is not allowing me to copy file of size 6GB
Solution:
1. PS3 will take all partition which is having file system FAT32. NTFS won't work for him :-).
2. FAT32 has 4GB file size limitation.
Cluster size = 32KB --> 2^15
Tottal Cluster = 28bit --> 2^28
Max partition size = 2^(28+15) --> 2^43 --> 8 terabyte
File size is stored as a 32 bit number (2^32 = 4GB).
So FAT32 won't allow files which is having size more than 4GB.
Reference:
understanding-file-size-limits-on-ntfs-and-fat
http://en.wikipedia.org/wiki/File_Allocation_Table
Laptops
Power - ultimate speed for complex applications -> Intel Core i7
Multimedia - ideal for video playback and multitasking -> Intel Core 2 Duo
Normal - everyday use -> Intel Pentium Dual-Core
Reference:
http://www.dell.co.in/home/laptops
http://www.intel.com/products/laptop/index.htm
HP - VERSATILE-PERFORMANCE
http://www.priceindia.in/laptop
http://www.youtube.com/user/channelintel
Processor Numbers - Intel Core Processors
25 February 2010
Ideal body weight
Body Mass Index = Weight / (height in meter * height in meter)
Reference:
http://www.wdxcyber.com/bmi.htm
Reference:
http://www.wdxcyber.com/bmi.htm
23 February 2010
online FM radio
download Winamp playlist for some Malayalam FM radios from here.
Reference:
http://www.shoutcast.com/Internet-Radio/malayalam
http://andomedia.custhelp.com/app/answers/detail/a_id/47
Reference:
http://www.shoutcast.com/Internet-Radio/malayalam
http://andomedia.custhelp.com/app/answers/detail/a_id/47
22 February 2010
802.11 channels
UNII - Unlicensed National Information Infrastructure
DFS - Dynamic Frequency Selection
TPC - Transmitter Power Control
5GHz radio devices should follow 802.11h specification - DFS and TPC
UNII2 - (52, 56, 60, 64 ==> 5250MHz - 5350MHz)
UNII2 Ext - (100, 104, 108, 112, 116, 120, 124, 128, 132, 136, 140 ==> 5470MHz - 5725MHz)
FCC Rule requires that products operating in the UNII-2 and UNII-2 extended bands must support Dynamic Frequency Selection (DFS), to detect and automatically adjusts channels to protect WLAN communications from interfering with military or weather radar systems.

Reference:
http://en.wikipedia.org/wiki/List_of_WLAN_channels
http://www.intel.com/support/wireless/sb/CS-025343.htm
white_paper_80211n_design_and_deployment_guidelines.html
Cisco - FCC Regulations Update
wiki - ETSI
DFS - Dynamic Frequency Selection
TPC - Transmitter Power Control
5GHz radio devices should follow 802.11h specification - DFS and TPC
UNII2 - (52, 56, 60, 64 ==> 5250MHz - 5350MHz)
UNII2 Ext - (100, 104, 108, 112, 116, 120, 124, 128, 132, 136, 140 ==> 5470MHz - 5725MHz)
FCC Rule requires that products operating in the UNII-2 and UNII-2 extended bands must support Dynamic Frequency Selection (DFS), to detect and automatically adjusts channels to protect WLAN communications from interfering with military or weather radar systems.
Reference:
http://en.wikipedia.org/wiki/List_of_WLAN_channels
http://www.intel.com/support/wireless/sb/CS-025343.htm
white_paper_80211n_design_and_deployment_guidelines.html
Cisco - FCC Regulations Update
wiki - ETSI
21 February 2010
3d
Avatar is being released in Digital 3d, so there are no colored lenses to wear. ;-)
Reference:
http://answers.yahoo.com/question/index?qid=20091214025502AAKohsd
Reference:
http://answers.yahoo.com/question/index?qid=20091214025502AAKohsd
20 February 2010
radix tree
PATRICIA - "Practical Algorithm To Retrieve Information Coded In Alphanumeric"
Radix Tree gives fastest possible ways to search prefixes.
With radix tree every internal node has at least two children.
radix trees are useful:
1. for constructing associative arrays with keys expressed as strings.
2. in the area of IP routing.
3. inverted indexes of text documents in information retrieval.
4. to map between real and virtual IRQ numbers.
5. in the memory management code, to quickly find pages which are dirty.

reference:
http://en.wikipedia.org/wiki/Radix_tree
http://lwn.net/Articles/175432
http://code.google.com/p/radixtree
Radix Tree gives fastest possible ways to search prefixes.
With radix tree every internal node has at least two children.
radix trees are useful:
1. for constructing associative arrays with keys expressed as strings.
2. in the area of IP routing.
3. inverted indexes of text documents in information retrieval.
4. to map between real and virtual IRQ numbers.
5. in the memory management code, to quickly find pages which are dirty.
reference:
http://en.wikipedia.org/wiki/Radix_tree
http://lwn.net/Articles/175432
http://code.google.com/p/radixtree
18 February 2010
multicast in detail
Internet Group Management Protocol (IGMP).
Multicast receiver inform the network that they are interested in receiving packets sent to that group. Hence a multicast distribution tree is constructed at the switch.

IGMP snooping takes place internally on L2 switch and its an optional feature for IGMP. It prevents the hosts from receiving unnecessary multicast traffic (DOS attack).
With IGMP snooping enabled,
-> when a switch hears an IGMP report / Join group from a host the switch adds the host's port number to the multicast list.
-> when the switch hears an IGMP report / Leave group, it removes the host's port from the table entry.
Reference:
IGMPv3 report packet - pcap
http://en.wikipedia.org/wiki/Multicast
http://en.wikipedia.org/wiki/IGMP
http://en.wikipedia.org/wiki/IGMP_snooping
http://www-net.cs.umass.edu/kurose/network/mcast/mcast.htm
Multicast receiver inform the network that they are interested in receiving packets sent to that group. Hence a multicast distribution tree is constructed at the switch.
IGMP snooping takes place internally on L2 switch and its an optional feature for IGMP. It prevents the hosts from receiving unnecessary multicast traffic (DOS attack).
With IGMP snooping enabled,
-> when a switch hears an IGMP report / Join group from a host the switch adds the host's port number to the multicast list.
-> when the switch hears an IGMP report / Leave group, it removes the host's port from the table entry.
Reference:
IGMPv3 report packet - pcap
http://en.wikipedia.org/wiki/Multicast
http://en.wikipedia.org/wiki/IGMP
http://en.wikipedia.org/wiki/IGMP_snooping
http://www-net.cs.umass.edu/kurose/network/mcast/mcast.htm
17 February 2010
video streaming using VLC
I have used "VLC media player 1.0.3 Goldeneye".
ON THE SERVER SIDE

-> Select "Media -> Streaming"

-> Add video file and press Stream

-> Select Next

-> Select "Display localy"
-> Select New destination as "UDP"
-> Select "Add"

-> give Address as "230.1.2.3"
-> address can be in between 224.0.0.0 - 239.255.255.255
-> And default port 1234
ON THE CLIENT SIDE

-> Select "Media -> Open Network Stream"

-> Give Protocol as "UDP"
-> Give Address as "230.1.2.3"
-> Give default port "1234"
Reference:
http://www.engadget.com/2005/11/29/how-to-stream-almost-anything-using-vlc
"ip forward-protocol udp ..." why???
IP Address: 192.168.30.201Broadcast - A transmission to all interface cards on the network.
Subnet mask: 255.255.240.0
Broadcast Address: BA = (IP) | ~(SM)
192.168.30.201 |
0.0.15.255
--------------
192.168.31.255
Broadcast Address: 192.168.31.255
* Limited Broadcast - Sent to all NICs on the some network segment as the source NIC. It is represented with the 255.255.255.255 TCP/IP address. This broadcast is not forwarded by routers so will only appear on one network segment.
* Direct broadcast - Sent to all hosts on a network. Routers may be configured to forward directed broadcasts on large networks. For network 192.168.31.0, the broadcast is 192.168.31.255.
It selectively forward limited UDP broadcasts received on an IP interface to a configured IP address.
The default ports forwarded are:
• Time service (port 37)
• TACACS service (port 49)
• Domain Naming System (port 53)
• Trivial File Transfer Protocol (TFTP) (port 69)
• NetBIOS Name Server (port 137)
• NetBIOS Datagram Server (port 138)
Reference:
Cisco IOS IP command referance - "ip forward-protocol"
http://www.comptechdoc.org/independent/networking/guide/netbroadcasting.html
28 January 2010
linux 2.6.32 installation on Fedora Core 12
Download Linux 2.6.32 source code from here.
Download the config file for 2.6.32 from here.
Reference:
Fedora Core 11 Intallation
Linux 2.6.31 Installation
Linux 2.6.32 Installation
Download the config file for 2.6.32 from here.
vi /sbin/installkernel
>> /sbin/new-kernel-pkg --dracut ...
cd /usr/src/kernels
tar xjvf linux-2.6.32.tar.bz2
mv config.32.2 .config
make oldconfig
make
make modules_install
make install
Reference:
Fedora Core 11 Intallation
Linux 2.6.31 Installation
Linux 2.6.32 Installation
27 January 2010
make a mininal linux kernel from Fedora Core 12
Details about Fedora Core 11 installation click here.
For the installation of kernel 2.6.32 refer here.
Other:
Reference:
http://www.brandonhutchinson.com/cpio_command.html
1. allocate 12GB of HDD space
   (don't select "Allocalte all disk space now")
2. Allocate 400MB of RAM
   (required for graphical mode installation)
3. Install FC12 on VMware
4. Review and modify partitioning layout
   (select "Create custom layout")
5. Delete VolGroup, sda1 and sda2 partitions
6. Create 800MB swap space
7. Create EXT4 file system and mount pount "/"
8. Un-select everything in software selection
9. Select the default repository
   ("Installation Repo")
10. Select "customize now" for software selection
11. Again un-select everything in software selection
12. A total of 200 packages will get installed.
mkdir /mnt/cdrom
vi /etc/fstab
>> /dev/cdrom /mnt/cdrom iso9660 defaults 0 0
mount /dev/cdrom
cd /mnt/cdrom/Pakages
rpm -ivh deltarpm* python-deltarpm* libxml2-python*
rpm -ivh createrepo*
cd /mnt
createrepo .
cd /etc/yum.repos.d/
vi fedora.repo >> enabled=0
vi fedora-updates.repo
>> baseurl=file:///mnt
>> #baseurl
>> #mirrorurl
>> enabled=1
>> gpgcheck=0
yum install ftp make which vim gcc ctags ncur*
yum install dhclient bzip2 man man-pages kernel-devel
yum install ntsysv gpm openssh* strace ...
vi /etc/syscofig/network-scripts/ifcfg-eth0
>> DEVICE=eth0
>> ONBOOT=yes
>> BOOTPROTO=dhcp
vi ~/.bashrc
>> alias vi='/usr/bin/vim'
vi /sbin/installkernel
>> /sbin/new-kernel-pkg --dracut ...
For the installation of kernel 2.6.32 refer here.
Other:
rpm --import /etc/pki/rpm-gpg/RPM-GPG-KEY-fedora
Reference:
http://www.brandonhutchinson.com/cpio_command.html
23 January 2010
gcc internals - 2
.globl _start

.section        .rodata
LC0: .string "hello world!!!\n"

.section        .text
_start:
 mov $LC0, %ecx
 mov $15, %edx
 mov $1, %ebx
 mov $4, %eax
 int $0x80

 mov $42, %ebx
 mov $1, %eax
 int $0x80
as tiny.s -o tiny.o
gcc -Wall -s -nostdlib tiny.o -o tiny; (448 bytes)
ld -s tiny.o -o tiny; (320 bytes)
./tiny ; echo $?
#define VADDR 0x08048000

.globl _start

.section .text
ehdr:
 .byte 0x7F
 .ascii "ELF"
 .byte 1,1,1,0,0,0,0,0,0,0,0,0  #16 (ELF magic header)
 .short 2                       #2 (type)
 .short 3                       #2 (machine)
 .long 1                        #4 (version)
 .long start + VADDR            #4 (entry)
 .long phdr                     #4 (phdr offset)
 .long 0                        #4 ()
 .long 0                        #4 ()
 .short ehdrsize                #2 (ehdr size)
 .short phdrsize                #2 (phdr size)
 .short 1                       #2 (phdr no.)
 .short 0
 .short 0
 .short 0
.equ ehdrsize, phdr - ehdr

phdr:
 .long 1                        #4 (type)
 .long 0                        #4 ()
 .long VADDR                    #4 (virtual addr)
 .long VADDR                    #4 (physic addr)
 .long filesize                 #4 (file size)
 .long filesize                 #4 (mem size)
 .long 5                        #4 ()
 .long 0x1000                   #4 ()
.equ phdrsize, start - phdr

start:
 mov $LC0+VADDR, %ecx
 mov $15, %edx
 mov $1, %ebx
 mov $4, %eax
 int $0x80

 mov $42, %ebx
 mov $1, %eax
 int $0x80

LC0:
.ascii "hello world!!!\n"
.equ filesize, end - ehdr

end:
cpp tiny.s > tiny.i
as tiny.i -o tiny.o
objcopy -O binary tiny.o tiny
chmod +x tiny
Referance:
http://www.muppetlabs.com/~breadbox/software/tiny/teensy.html
http://svn.gna.org/svn/grub4dos/branches/test/stage2/bootlacestart.S
http://timelessname.com/elfbin
gcc internals
gcc -v
gcc --print-search-dirs
gcc -print-prog-name=cc1
ld --verbose
objdump -h hello
objdump -d -j .text hello
readelf -S hello
objcopy -R .comment hello hello_new

objdump -t humble
nm humble
GCC Options:
-E (pre-process)
-S (assemble)
-c (compile)
.text    executable code
.data    initialized global/local static variable.
.bss     non initialized static global/local variable.
cat > hello.c << EOF
#include <stdio.h>
int main()
{
    printf("hello world!!!\n");
    _exit(0);
}
EOF
cat > hello.lds << EOF
SEARCH_DIR("/usr/lib"); SEARCH_DIR("/lib");
SECTIONS
{
  . = 0x08048000 + SIZEOF_HEADERS;
  .text           : { *(.text) }
  .rodata         : { *(.rodata) }
  .data           : { *(.data) }
  .got            : { *(.got.plt) }
  .bss            : { *(.bss) }
}
EOF
gcc -E hello.c > hello.i
gcc -S hello.i
gcc -c hello.s
gcc hello.o -o hello
cpp hello.c > hello.i
`gcc -print-prog-name=cc1` hello.i
as hello.s -o hello.o
ld -dynamic-linker /lib/ld-linux.so.2 -Thello.lds -o hello hello.o -lc
Referance:
http://www.tenouk.com/ModuleW.html
12 January 2010
Linux, Sendmail and Gmail.com
i have tested this on Fedora code 7 only
Add these lines just before MAILER in the file "/etc/mail/sendmail.mc"
update "/etc/mail/auth/client-info" with
Referance:
http://www.linuxha.com/other/sendmail/gmail.html
http://www.notesbit.com/index.php/scripts-unix/linux-sendmail-automation-and-comcast-net-how-to-setup
Add these lines just before MAILER in the file "/etc/mail/sendmail.mc"
dnl
FEATURE(`authinfo',`hash /etc/mail/auth/client-info')dnl
LOCAL_DOMAIN(`cookie.uucp')dnl
define(`SMART_HOST',`smtp.gmail.com')dnl
define(`RELAY_MAILER_ARGS', `TCP $h 587')
define(`ESMTP_MAILER_ARGS', `TCP $h 587')
define(`confAUTH_MECHANISMS', `EXTERNAL GSSAPI DIGEST-MD5 CRAM-MD5 LOGIN PLAIN')dnl
define(`CERT_DIR', `MAIL_SETTINGS_DIR`'certs')dnl
define(`confCACERT_PATH', `CERT_DIR')dnl
define(`confCACERT', `CERT_DIR/CAcert.pem')dnl
define(`confSERVER_CERT', `CERT_DIR/mycert.pem')dnl
define(`confSERVER_KEY', `CERT_DIR/mykey.pem')dnl
define(`confCLIENT_CERT', `CERT_DIR/mycert.pem')dnl
define(`confCLIENT_KEY', `CERT_DIR/mykey.pem')dnl
FEATURE(masquerade_envelope)dnl
FEATURE(masquerade_entire_domain)dnl
MASQUERADE_AS(`comcast.net') dnl
FEATURE(genericstable, `hash -o /etc/mail/genericstable') dnl
GENERICS_DOMAIN_FILE(`/etc/mail/genericsdomain')dnl
MAILER(local)dnl
dnl
mkdir /etc/mail/auth
touch /etc/mail/auth/client-info
chmod 700 /etc/mail/auth
chmod 600 /etc/mail/auth/client-info
update "/etc/mail/auth/client-info" with
AuthInfo:smtp.gmail.com "U:smmsp" "I:USER_ID" "P:PASSWD" "M:PLAIN"
AuthInfo:smtp.gmail.com:587 "U:smmsp" "I:USER_ID" "P:PASSWD" "M:PLAIN"
cd /etc/mail/auth
makemap -r hash client-info.db < client-info
make -C /etc/mail
echo "cookie!cookie!asterisk humble@testing.com" >/etc/mail/genericsdomain
service restart sendmail
echo "test mail contents" > ~/1
mail -s "Test Mail" MyMail@Domail.com < ~/1

mailq
Referance:
http://www.linuxha.com/other/sendmail/gmail.html
http://www.notesbit.com/index.php/scripts-unix/linux-sendmail-automation-and-comcast-net-how-to-setup
Subscribe to:
Posts (Atom)