Setup the WampServer as explained here
------------------Generate your own CA------------------
1. Generate a ca key:
openssl genrsa -des3 -out ca.key 1024
2. Generate a ca certificate:
openssl req -new -x509 -days 365 -key ca.key -out ca.crt
subject=/C=IN/ST=Karnataka/L=Bangalore/O=Nortel/OU=Engineering/CN=localhostca
3. Generate a server key:
openssl genrsa -des3 -out server.key 1024
4. Create a certificate signing request:
openssl req -new -key server.key -out server.csr
subject=/C=IN/ST=Karnataka/L=Bangalore/O=Nortel/OU=Engineering/CN=localhost
5. Sign the certificate signing request:
openssl x509 -req -days 365 -in server.csr -CA ca.crt -CAkey ca.key -set_serial 01 -out server.crt
6. Create an insecure version of the server.key:
openssl rsa -in server.key -out server.key.insecure
mv server.key.insecure server.key
openssl req -noout -text -in server.csr
openssl x509 -noout -text -in server.crt
server.crt: The self-signed server certificate.
server.key: The private server key.
ca.crt: The Certificate Authority's own certificate.
--------------------------------------------------------
1. Update "C:\Program Files\wamp\bin\apache\Apache2.2.11\conf\httpd.conf"
-> LoadModule ssl_module modules/mod_ssl.so
-> Include conf/extra/httpd-ssl.conf
2. Update "C:\Program Files\wamp\bin\apache\Apache2.2.11\conf\extra\httpd-ssl.conf"
-> #DocumentRoot "C:/Program Files/Apache Software Foundation/Apache2.2/htdocs"
-> SSLCertificateFile "C:/Program Files/Apache Software Foundation/Apache2.2/conf/server.crt"
-> SSLCertificateKeyFile "C:/Program Files/Apache Software Foundation/Apache2.2/conf/server.key"
3. Copy server.crt and server.key to "C:\Program Files\Apache Software Foundation\Apache2.2\conf"
4. Restart Apache server
5. Copy ca.crt to:
-> Mozilla Tools >> Options >> Advanced >> Encryption >> Veiw Certificates >> Authorities
-> IE Tools >> Internet Options >> Content >> Certificates >> Trusted Root Certification Authorities
If https://localhost is not working then refer the logs at "C:\Program Files\Apache Software Foundation\Apache2.2\logs"
Reference:
http://middleware.its.state.nc.us/middleware/Documentation/en_US/htm/csqzas00/csqzas000p.htm
http://progtutorials.tripod.com/SSL.htm
http://www.tc.umn.edu/~brams006/selfsign.html
http://www.tc.umn.edu/~brams006/selfsign_redhat.html
http://articles.techrepublic.com.com/2415-3513_11-167032.html
30 July 2009
Eclipse - quick start
1. Download the latest Java SE Development Kit (JDK) from here (JDK 6 Update 14).
2. Download the latest Eclipse IDE for Java EE Developers from here.
How to create a sample Java Project in Eclipse:
1. File -> New -> Java Project
2. Give project name, Use default JRE
3. Navigate -> Show In -> Package Explorer
4. Right click on project src, New -> Class
5. Give Name, Modifier, Create stubs and Comments
6. Run and Debug the code at Run menu

Reference:
http://java.sun.com/javase/technologies/index.jsp
2. Download the latest Eclipse IDE for Java EE Developers from here.
How to create a sample Java Project in Eclipse:
1. File -> New -> Java Project
2. Give project name, Use default JRE
3. Navigate -> Show In -> Package Explorer
4. Right click on project src, New -> Class
5. Give Name, Modifier, Create stubs and Comments
6. Run and Debug the code at Run menu
----------------------test.java----------------------
public class test {

 public static void main(String[] args) {
  System.out.println("Hello world!!!\n");
 }

}
-----------------------------------------------------

Reference:
http://java.sun.com/javase/technologies/index.jsp
24 July 2009
Embedding Applets in a Web page - 3
Setup the WampServer as explained here
-------------------------------------------------------
1. Save TestApplet2.java, test2.html and mymanifest inside the website's home page
2. Make sure JRE is installed in the machine.
3. javac TestApplet3.java
4. jar cvfm TestApplet3.jar mymanifest TestApplet3.class
5. del TestApplet3.class
6. http://localhost/test3.html
7. appletviewer -classic test2.html
8. java -jar TestApplet3.jar
-------------------------------------------------------
Reference:
How to make a JAVA application - executable JAR archive:
-----------------TestApplet3.java-----------------------
import javax.swing.*;

public class TestApplet3 extends JApplet {
  public void init() {
    add (new JLabel("Hello World", JLabel.CENTER));
  }
}
--------------------------------------------------------
-----------------------test3.html-----------------------
<HTML>
<HEAD>
<TITLE>My new applet page</TITLE>
</HEAD>
<BODY>
<OBJECT
    classid="clsid:8AD9C840-044E-11D1-B3E9-00805F499D93"
    WIDTH="170"
    HEIGHT="70"
    codebase="http://java.sun.com/products/plugin/autodl/jinstall-1_4_2_05-windows-i586.cab#Version=1,4,2,5">
  <PARAM NAME=CODE VALUE="TestApplet3">
  <PARAM NAME=CACHE_OPTION VALUE="plugin">
  <PARAM NAME=CACHE_ARCHIVE VALUE="TestApplet3.jar">

  <COMMENT>
   <EMBED
    TYPE="application/x-java-applet;version=1.4.2"
    CODE="TestApplet3"
    CACHE_OPTION="plugin"
    CACHE_ARCHIVE="TestApplet3.jar"
    WIDTH="170"
    HEIGHT="70">
   </EMBED>
  </COMMENT>
</OBJECT>
</BODY>
-------------------------------------------------------
----------------------mymanifest-----------------------
Manifest-Version: 1.2
Main-Class: TestApplet3
Created-By: 1.4 (Sun Microsystems Inc.)
-------------------------------------------------------
-------------------------------------------------------
1. Save TestApplet2.java, test2.html and mymanifest inside the website's home page
2. Make sure JRE is installed in the machine.
3. javac TestApplet3.java
4. jar cvfm TestApplet3.jar mymanifest TestApplet3.class
5. del TestApplet3.class
6. http://localhost/test3.html
7. appletviewer -classic test2.html
8. java -jar TestApplet3.jar
-------------------------------------------------------
Reference:
How to make a JAVA application - executable JAR archive:
Embedding Applets in a Web page - 2
Setup the WampServer as explained here
-------------------------------------------------------
1. Save TestApplet2.java and test2.html inside the website's home page
2. Make sure JRE is installed in the machine.
3. javac TestApplet2.java
4. http://localhost/test2.html
5. appletviewer -classic test2.html
-------------------------------------------------------
Reference:
Embedding Applets in a Web page
-----------------TestApplet2.java-----------------
import javax.swing.*;
public class TestApplet2 extends JApplet {
  public void init() {
    add (new JLabel("Hello World", JLabel.CENTER));
  }
}
-------------------------------------------------------
-----------------------test2.html-----------------------
<OBJECT
    classid="clsid:8AD9C840-044E-11D1-B3E9-00805F499D93"
    WIDTH="170"
    HEIGHT="70"
    codebase="http://java.sun.com/products/plugin/autodl/jinstall-1_4_2_05-windows-i586.cab#Version=1,4,2,5">
  <PARAM NAME=CODE VALUE="TestApplet2.class">
  <PARAM NAME=CACHE_OPTION VALUE="plugin">
  <PARAM NAME=CACHE_ARCHIVE VALUE="TestApplet2.class">

  <COMMENT>
   <EMBED
    TYPE="application/x-java-applet;version=1.4.2"
    CODE="TestApplet2.class"
    CACHE_OPTION="plugin"
    CACHE_ARCHIVE="TestApplet2.class"
    WIDTH="170"
    HEIGHT="70">
   </EMBED>
  </COMMENT>
</OBJECT>
-------------------------------------------------------
-------------------------------------------------------
1. Save TestApplet2.java and test2.html inside the website's home page
2. Make sure JRE is installed in the machine.
3. javac TestApplet2.java
4. http://localhost/test2.html
5. appletviewer -classic test2.html
-------------------------------------------------------
Reference:
Embedding Applets in a Web page
Embedding Applets in a Web page - 1
Setup the WampServer as explained here
-------------------------------------------------------
1. Save HelloWorldApplet.java and test.html inside the website's home page
2. Make sure JRE is installed in the machine.
3. javac HelloWorldApplet.java
4. http://localhost/test.html
5. appletviewer -classic test.html
-------------------------------------------------------
Reference:
-----------------HelloWorldApplet.java-----------------
import java.applet.Applet;
import java.awt.*;
import java.awt.event.*;

public class HelloWorldApplet extends Applet{
  public static void main(String[] args){
    Frame frame = new Frame("Roseindia.net");
    frame.setSize(400,200);
    Applet app = new HelloWorldApplet();
    frame.add(app);
    frame.setVisible(true);
    frame.addWindowListener(new WindowAdapter(){
      public void windowClosing(WindowEvent e){
        System.exit(0);
      }
    });
  }
  public void paint(Graphics g){
    g.drawString("Hello World!",200,100);
  }
}
-------------------------------------------------------
-----------------------test.html-----------------------
<html>
<head>
<title>A Simple Applet program</title>
</head>
<body>
<APPLET CODE="HelloWorldApplet.class" WIDTH=700 HEIGHT=500>
</APPLET>
</body>
</html>
-------------------------------------------------------
-------------------------------------------------------
1. Save HelloWorldApplet.java and test.html inside the website's home page
2. Make sure JRE is installed in the machine.
3. javac HelloWorldApplet.java
4. http://localhost/test.html
5. appletviewer -classic test.html
-------------------------------------------------------
Reference:
19 July 2009
VMware and Fedora Core 7
VMware Server - The free VMware Server is a hosted virtualization platform that installs like an application on any existing server hardware and partitions a physical server into multiple virtual machines.
VMware ESXi - The free VMware ESXi doesn't require and Host operating system, the avoidance of host os provides nmatched levels of performance and reliability.
Download Vmware Server 2.0.1 from here.
Download Vmware Server 1.0.9 from here.
--------How to install VMware Server (2.0.1) on windows host machine--------
1. Download VMware Server 2.0.1 from here.
2. Download Fedora Core 7 here.
3. Start the VMware, login with local username and password without domain.
4. Virtual Machine >> Create Virtual Machine
-> Name: FC7
-> Operating System: Linux Operating System
-> Memory Size: Recommended Size
-> Create a New Virtual Disk (10GB+)
-> Add a Network Adapter >> Network Connection: Bridged
-> DVD Drive: use ISO Image
-> Don't add a Floppy Drive
-> Don't add a USB controller
5. Power ON and install Fedora Core 11
6. Summary >> Status >> VMware Tools >> Install VMware Tools
7. su; cp /media/VMware Tools/VMwareTools-7.7.5-156745.tar.gz /root
8. tar xzvf VMwareTools-7.7.5-156745.tar.gz; cd vmware-tools-distrib
9. ./vmware-install.pl
ERROR!!!!!
10. Get vmware-tools patch for linux 2.6.29 from here.
12. Combine the patch files and apply
-> cd vmware-tools-distrib/lib/modules
-> cp -r source source-backup; cd source
-> tar xzvf vmwaretools-7.7.5_156745_for_2.6.29.tgz
-> ls *.tar | xargs -n1 tar xvf
-> sed -i 's/--- /--- original\//g' *.patch
-> sed -i 's/+++ /+++ work\//g' *.patch
-> ls *.patch | xargs cat > all
-> mv all all.patch
-> patch -p1 < all.patch
13. ./vmware-install.pl
STILL ERROR!!!!!!
----------------------------------------------------------------------------
Reference:
http://www.vmware.com/products/product_index.html
http://download3.vmware.com/demos/esxi/VMware_ESXi.html
18 July 2009
pcidump.c
#include <stdio.h>lspci
#include <string.h>
#include <fcntl.h>
#include <errno.h>
#include <stdlib.h>
#include <linux/pci.h>
#include <asm/page.h>
/* A structure to declare how data is decoded */
struct pcidump_info {
int offset; /* the data item to retrieve */
unsigned long bitmask;
int bool; /* true or false */
char *string;
};
#define ONEBYTE 0xFF
#define TWOBYTES 0xFFFF
#define FOURBYTES 0xFFFFFFFF
struct pcidump_info dumpinfo[] = {
{0, 0, 0, "\tCompulsory registers:\n"},
{PCI_VENDOR_ID, TWOBYTES, 0, "Vendor id: 0x%04x\n"},
{PCI_DEVICE_ID, TWOBYTES, 0, "Device id: 0x%04x\n"},
{PCI_COMMAND, TWOBYTES, 0, "Command Register: 0x%04x\n"},
{PCI_STATUS, TWOBYTES, 0, "Status Register: 0x%04x\n"},
{PCI_REVISION_ID, ONEBYTE, 0, "Revision id (decimal): %i\n"},
{PCI_CLASS_PROG, ONEBYTE, 0, "Programmer Interface: 0x%02x\n"},
{PCI_CLASS_DEVICE, TWOBYTES, 0, "Class of device: 0x%04x\n"},
{PCI_HEADER_TYPE, 0x7f, 0, "Header type: 0x%02x\n"},
{PCI_HEADER_TYPE, 0x80, 1, "Multi function device: %c\n"},
{0, 0, 0, "\tOptional registers:\n"},
{PCI_CACHE_LINE_SIZE, ONEBYTE, 0, "Cache line size (decimal): %i\n"},
{PCI_LATENCY_TIMER, ONEBYTE, 0, "Latency timer (decimal): %i\n"},
{PCI_BIST, ONEBYTE, 0, "Is Built-In-Self-Test available: %c\n"},
{PCI_BASE_ADDRESS_0, FOURBYTES, 0, "Base Address 0 (B0): 0x%08x\n"},
{PCI_BASE_ADDRESS_1, FOURBYTES, 0, "Base Address 1 (B1): 0x%08x\n"},
{PCI_BASE_ADDRESS_2, FOURBYTES, 0, "Base Address 2 (B2): 0x%08x\n"},
{PCI_BASE_ADDRESS_3, FOURBYTES, 0, "Base Address 3 (B3): 0x%08x\n"},
{PCI_BASE_ADDRESS_4, FOURBYTES, 0, "Base Address 4 (B4): 0x%08x\n"},
{PCI_BASE_ADDRESS_5, FOURBYTES, 0, "Base Address 5 (B5): 0x%08x\n"},
{PCI_SUBSYSTEM_ID, TWOBYTES, 0, "Subsystem id: 0x%04x\n"},
{PCI_SUBSYSTEM_VENDOR_ID, TWOBYTES,0, "Subsystem vendor: 0x%04x\n"},
{PCI_ROM_ADDRESS, FOURBYTES, 0, "Expantion Rom base address: 0x%08x\n"},
{PCI_INTERRUPT_LINE, ONEBYTE, 0, "Interrupt line (decimal): %i\n"},
{PCI_INTERRUPT_PIN, ONEBYTE, 0, "Interrupt pin (decimal): %i\n"},
{PCI_MIN_GNT, ONEBYTE, 0, "Min bus grant time (decimal): %i\n"},
{PCI_MAX_LAT, ONEBYTE, 0, "Max bus latency acceptable (decimal): %i\n"},
{0x00, 0, 0, NULL}
};
unsigned char buffer[PAGE_SIZE];
int main(int argc, char **argv)
{
int fd, len;
char file[] = "/proc/bus/pci/00/00.0";
char *fname = file;
unsigned char *curr, *end;
if (argc>1) {
fname = argv[1];
}
if (argc != 2) {
printf("Usage: \"%s <file name>\"\n", argv[0]);
printf("\tfilename should embed binary pci configuration data\n");
printf("\tif filename is missing, \"%s\" is used\n", fname);
exit(0);
}
fd=open(fname, O_RDONLY);
if (fd<0) {
fprintf(stderr,"%s: %s: %s\n", argv[0], fname, strerror(errno));
exit(1);
}
switch (len=read(fd,buffer,PAGE_SIZE)) {
case 0:
fprintf(stderr,"%s: %s: no data\n", argv[0], fname);
exit(1);
case -1:
fprintf(stderr,"%s: %s: %s\n", argv[0], fname, strerror(errno));
exit(1);
default: break;
}
if (len < 64) {
buffer[len]='\0';
fprintf(stderr," %s: %s: %s\n", argv[0], fname, buffer);
exit(1);
}
if (len % 64) {
fprintf(stderr," %s: %s: incorrect data size: %i\n",
argv[0], fname, len);
exit(1);
}
for (end = buffer+len, curr = buffer; curr < end; curr += 256) {
struct pcidump_info *ptr;
unsigned int datum;
for (ptr = dumpinfo; ptr->string; ptr++) {
/*
* Perform a little-endian read of the item
*/
datum = curr[ptr->offset]
| (curr[ptr->offset+1]<<8)
| (curr[ptr->offset+2]<<16)
| (curr[ptr->offset+3]<<24);
datum &= ptr->bitmask;
printf(ptr->string, ptr->bool ? (datum ? 'y' : 'n') : datum);
}
printf("\n");
}
return 0;
}
gcc -o pcidump pcidump.c
./pcidump /proc/bus/pci/00/12.0
 Compulsory registers:
  Vendor id: 0x1022
  Device id: 0x2000
  Command Register: 0x0003
  Status Register: 0x0280
  Revision id (decimal): 16
  Programmer Interface: 0x00
  Class of device: 0x0200
  Header type: 0x00
  Multi function device: n
 Optional registers:
  Cache line size (decimal): 0
  Latency timer (decimal): 64
  Is Built-In-Self-Test available:
  Base Address 0 (B0): 0x00001401
  Base Address 1 (B1): 0x00000000
  Base Address 2 (B2): 0x00000000
  Base Address 3 (B3): 0x00000000
  Base Address 4 (B4): 0x00000000
  Base Address 5 (B5): 0x00000000
  Subsystem id: 0x2000
  Subsystem vendor: 0x1022
  Expantion Rom base address: 0x00000000
  Interrupt line (decimal): 9
  Interrupt pin (decimal): 1
  Min bus grant time (decimal): 6
  Max bus latency acceptable (decimal): 255

Reference:
pcidump.c
09 July 2009
Autonegotiation
Autonegotiation is an Ethernet procedure by which two connected devices choose common transmission parameters, such as speed and duplex mode.
In the OSI model, autonegotiation resides in the physical layer.
It is defined in the IEEE standard 802.3ab.
Fast link pulse (FLP) burst
The FLP signals are generated automatically at power-up; it is used to send information about device capabilities.
The pulse is transmitted with a repeating sequence of a 16 ± 8-ms.
The FLP burst is made as follows:
There are 17 pulses at distance 125 µs. In the middle between each set of two consecutive pulses, another pulse may or may not be present. The presence of a pulse represents a logical 1, the absence a logical 0.
As a result, every burst represents a logical word of 16 bits called link code word (LCW).

A link is considered down if neither a packet nor the pulses are received for 50-150 ms.
For copper-based boards, the keywords interact as follows:
The default operation is auto-negotiate. The board advertises all supported speed and duplex combinations, and it links at the highest common speed and duplex mode IF the link partner is set to auto-negotiate.
If Speed = 1000, limited auto-negotiation is enabled and only 1000 Mbps is advertised.
If Speed = 10 or 100, then both Speed and Duplex should be set. Auto-negotiation is disabled, and the AutoNeg parameter is ignored. Partner SHOULD also be forced.
-------------------------------------------------
ethtool is a Linux net driver diagnostic and tuning tool for the Linux 2.4.x (or later) series of kernels.
ethtool eth0
ethtool –s eth0 speed 100 duplex full autoneg off
ethtool –s eth0 autoneg on
Reference:
http://en.wikipedia.org/wiki/Autonegotiation
http://www.foundrynet.com/ss/resource-center/ethernet-auto.html
In the OSI model, autonegotiation resides in the physical layer.
It is defined in the IEEE standard 802.3ab.
Fast link pulse (FLP) burst
The FLP signals are generated automatically at power-up; it is used to send information about device capabilities.
The pulse is transmitted with a repeating sequence of a 16 ± 8-ms.
The FLP burst is made as follows:
There are 17 pulses at distance 125 µs. In the middle between each set of two consecutive pulses, another pulse may or may not be present. The presence of a pulse represents a logical 1, the absence a logical 0.
As a result, every burst represents a logical word of 16 bits called link code word (LCW).
A link is considered down if neither a packet nor the pulses are received for 50-150 ms.
If a dual-speed 10/100 Ethernet interface with Auto-Negotiation is connected to a 10BASE-T hub that does not have Auto-Negotiation, the interface will generate FLPs but will only receive NLPs from the 10BASE-T hub. The Auto-Negotiation protocol in the interface will detect the presence of Normal Link Pulses and automatically place the interface in 10BASE-T mode.
When an Auto-Negotiation hub with multiple capabilities in its ports is connected to an interface that only supports 100BASE-TX and is not equipped with Auto-Negotiation, the Auto-Negotiation protocol will set the hub port to operate in 100BASE-TX mode.
For copper-based boards, the keywords interact as follows:
The default operation is auto-negotiate. The board advertises all supported speed and duplex combinations, and it links at the highest common speed and duplex mode IF the link partner is set to auto-negotiate.
If Speed = 1000, limited auto-negotiation is enabled and only 1000 Mbps is advertised.
If Speed = 10 or 100, then both Speed and Duplex should be set. Auto-negotiation is disabled, and the AutoNeg parameter is ignored. Partner SHOULD also be forced.
-------------------------------------------------
ethtool is a Linux net driver diagnostic and tuning tool for the Linux 2.4.x (or later) series of kernels.
ethtool eth0
ethtool –s eth0 speed 100 duplex full autoneg off
ethtool –s eth0 autoneg on
Reference:
http://en.wikipedia.org/wiki/Autonegotiation
http://www.foundrynet.com/ss/resource-center/ethernet-auto.html
07 July 2009
Guid to fill ITR Yourself
Disclaimer:
Information about Income Tax Return E-Filing can be found here.
----------------steps to the e-filing----------------
1. Get all Form-16 from the Employers.
2. Create an account at Income Tax e-Filing Website.
3. Download ITR-1 for A.Y 2009-10 from here.
4. Fill up the form with information provided in Form-16.
a. ITEM 1 -> ITEM 6 from Form-16 (Add all).
b. ITEM 4 -> ITEM 9 from Form-16 + Savings not in Form-16 (Add all).
c. ITEM 4m -> Copy from the same sheet
Give ITEM 7 from ITR-1 to Income tax calculator.
d. ITEM 8a -> Total income tax - Education cess - SHEC
e. ITEM 9c -> Education cess + SHEC
5. After filling up the form, Generate tax return XML.
6. Submit the ITR without digital signature for A.Y 2009-10.
7. Take printout of acknowledgment/ITR-V Form.
8. Post the signed ITR-V to Income Tax Department.
-----------------------------------------------------
Reference:
http://www.investmentyogi.com/cs/forums/t/290.aspx
http://www.rediff.com/money/2007/jul/06tax.htm
http://www.pankajbatra.com/2009/06/27/file-income-tax-return-online-yourself
Flow the blog with your own risk!!!
.Information about Income Tax Return E-Filing can be found here.
----------------steps to the e-filing----------------
1. Get all Form-16 from the Employers.
2. Create an account at Income Tax e-Filing Website.
3. Download ITR-1 for A.Y 2009-10 from here.
4. Fill up the form with information provided in Form-16.
a. ITEM 1 -> ITEM 6 from Form-16 (Add all).
b. ITEM 4 -> ITEM 9 from Form-16 + Savings not in Form-16 (Add all).
c. ITEM 4m -> Copy from the same sheet
Give ITEM 7 from ITR-1 to Income tax calculator.
d. ITEM 8a -> Total income tax - Education cess - SHEC
Ex:- for 5,00,000/- the total income tax is 56,650/-, Education cess is 1,100/- and SHEC is 550/-. Here tax payable of aggregate income is 55,000/-(56,650 - 1,100 - 550).
e. ITEM 9c -> Education cess + SHEC
5. After filling up the form, Generate tax return XML.
6. Submit the ITR without digital signature for A.Y 2009-10.
7. Take printout of acknowledgment/ITR-V Form.
8. Post the signed ITR-V to Income Tax Department.
Form ITR-V to be mailed in a A4 size envelope BY ORDINARY POST ONLY to “Income Tax Department – CPC, Post Box No – 1, Electronic City Post Office, Bangalore – 560100, Karnataka” within thirty days after the date of e-filing of return. No Form ITR-V shall be received in any other office of the Income-tax Department or in any other manner.
No supporting shall be attached with your IT return. Simply fill up your ITR-1 and file. As per the instructions, any attachments(including Form-16) with ITR will be returned back to the assessee by the Dept. across the counter. However, keep all your additional savings details in your record for filing with Dept. as and when called for
-----------------------------------------------------
Reference:
http://www.investmentyogi.com/cs/forums/t/290.aspx
http://www.rediff.com/money/2007/jul/06tax.htm
http://www.pankajbatra.com/2009/06/27/file-income-tax-return-online-yourself
05 July 2009
The Final Countdown
We're leaving together
but still it's farewell
and maybe we'll come back,
to earth, who can tell?
I guess there is no one to blame
we're leaving ground (leaving ground)
will things ever be the same again?
It's the final countdown.
The final countdown.
Oh, We're heading for Venus (Venus)
and still we stand tall
cause maybe they've seen us
and welcome us all, yeah
with so many light years to go
and things to be found (to be found)
I'm sure that we'll all miss her so
It's the final countdown.
The final countdown.
The final countdown (final countdown).
oh...oh
The final countdown.
Oh, it's the final countdown.
The final countdown.
The final countdown. (final countdown)
Oh, it's the final countdown
we're leaving together
The final countdown
we'll all miss her so
It's the final countdown (final countdown)
Oh, it's the final countdown
04 July 2009
Inline assembly in Linux
Basic inline
The format of basic inline assembly is very much straight forward.
Its basic form is:
asm("assembly code");
example:
asm("movl %ecx %eax"); /* moves the contents of ecx to eax */
__asm__("movb %bh (%eax)"); /*moves the byte from bh to the memory pointed by eax */
Extended inline
In extended assembly, we can also specify the operands.
Its basic format is:
Example:
int a=10, b;
Constraints
Constraint modifiers:
"=" : Means that this operand is write-only.
"&" : Means that this operand is an earlyclobber operand.
Information about more constraints are available here.
asm ("movl %%eax, %0\n" :"=r"(myval));
Here the variable myval is kept in a register, the value in register eax is copied onto that register, and the value of myval is updated into the memory from this register.
asm("sidt %0\n" : :"m"(loc));
When the operands are in the memory, any operations performed on them will occur directly in the memory location.
asm ("incl %0" :"=a"(var):"0"(var));
Now the input and output operands are in the same register, EAX.
Reference:
80386 Instruction Set
http://www.ibm.com/developerworks/linux/library/l-ia.html
http://www.ibiblio.org/gferg/ldp/GCC-Inline-Assembly-HOWTO.html
The format of basic inline assembly is very much straight forward.
Its basic form is:
asm("assembly code");
example:
asm("movl %ecx %eax"); /* moves the contents of ecx to eax */
__asm__("movb %bh (%eax)"); /*moves the byte from bh to the memory pointed by eax */
Extended inline
In extended assembly, we can also specify the operands.
Its basic format is:
asm ( assembler template
      : output operands                  /* optional */
      : input operands                   /* optional */
      : list of clobbered registers      /* optional */
      );
Example:
int a=10, b;
asm ("movl %1, %%eax;
      movl %%eax, %0;"
      :"=r"(b)        /* output */
      :"r"(a)         /* input */
      :"%eax"         /* clobbered register */
      );
Constraints
+---+--------------------+
| r |    Register(s)     |
+---+--------------------+
| a |   %eax, %ax, %al   |
| b |   %ebx, %bx, %bl   |
| c |   %ecx, %cx, %cl   |
| d |   %edx, %dx, %dl   |
| S |   %esi, %si        |
| D |   %edi, %di        |
| m |   memory operant   |
+---+--------------------+
Constraint modifiers:
"=" : Means that this operand is write-only.
"&" : Means that this operand is an earlyclobber operand.
Information about more constraints are available here.
asm ("movl %%eax, %0\n" :"=r"(myval));
Here the variable myval is kept in a register, the value in register eax is copied onto that register, and the value of myval is updated into the memory from this register.
asm("sidt %0\n" : :"m"(loc));
When the operands are in the memory, any operations performed on them will occur directly in the memory location.
asm ("incl %0" :"=a"(var):"0"(var));
Now the input and output operands are in the same register, EAX.
-----------------stringlen1.c-----------------
#include <unistd.h>

static inline size_t strlen1(const char * s)
{
register int __res;

/* EDI = &"STRING";
 * EAX = 0;
 * ECX = 0xFFFFFFFF;
 *
 * OUTPUT at ECX
 */
__asm__ __volatile__(
        "repne\n\t"
        "scasb\n\t"
        "notl %0\n\t"
        "decl %0"
        :"=c" (__res): "D" (s),"a" (0), "0" (0xffffffff));
return __res;
}

int main()
{
    char buff[] = "Hello world!!!";
    int len = strlen1(buff);

    printf("length of string \"%s\" is %d\n", buff, len);

    return 0;
}
---------------------------------------------
gcc -o stringlen1 stringlen1.c
./stringlen1
 length of string "Hello world!!!" is 14
---------------------------------------------
-----------------atomicinc.c-----------------
static __inline__ void atomic_inc(int *val)
{
        __asm__ __volatile__(
                "lock; incl %0"
                :"=m" (*val)
                :"m" (*val));
}

int main()
{
        int value = 0;

        printf("value = %d\n", value);
        atomic_inc(&value);
        printf("value = %d\n", value);

        return 0;
}
--------------------------------------------------
gcc -o atomicinc atomicinc.c
./atomicinc
 value = 0
 value = 1
--------------------------------------------------
Reference:
80386 Instruction Set
http://www.ibm.com/developerworks/linux/library/l-ia.html
http://www.ibiblio.org/gferg/ldp/GCC-Inline-Assembly-HOWTO.html
03 July 2009
How stack works
The stack is a special reserved area in memory for placing data.
The stack is reserved at the end of the memory area, and as data is placed on the stack, it grows downward.
The ESP register contains the memory address of the stack.
-> The PUSH, POP, CALL, RET instructions update the stack pointer indirectly.
-> Data can be placed on the stack by utilizing the ESP register as a memory pointer.
-> The stack is an important element in passing data between functions.
When the CALL instruction is executed, it places the EIP register onto the stack and then modifies the EIP register to point to the called function address. When the called function is completed, it retrieves the old EIP register value from the stack and returns control back to the original program.
The ESP register is usually copied to the EBP register at the beginning of the function.
The EBP register is used as the base pointer to the stack for all access to the stack within the function. Before returning to the calling program, the ESP register must be restored to the location pointing to the calling memory location.
Reference:
Professional Assembly Language By Richard Blum
The stack is reserved at the end of the memory area, and as data is placed on the stack, it grows downward.
The ESP register contains the memory address of the stack.
-> The PUSH, POP, CALL, RET instructions update the stack pointer indirectly.
-> Data can be placed on the stack by utilizing the ESP register as a memory pointer.
-> The stack is an important element in passing data between functions.
When the CALL instruction is executed, it places the EIP register onto the stack and then modifies the EIP register to point to the called function address. When the called function is completed, it retrieves the old EIP register value from the stack and returns control back to the original program.
The ESP register is usually copied to the EBP register at the beginning of the function.
The EBP register is used as the base pointer to the stack for all access to the stack within the function. Before returning to the calling program, the ESP register must be restored to the location pointing to the calling memory location.
function:
   pushl %ebp
   movl %esp, %ebp
   < normal function code goes here>
   movl %ebp, %esp
   popl %ebp
   ret

main:
   push valN
   push val1
   call function
   add [N*4], %esp
----------start cpuid.s----------
#
# cpuid.s Sample program to extract the processor Vendor ID
#

.section .data
output:
.ascii "The processor Vendor ID is 'xxxxxxxxxxxx'\n"

.section .text
.globl _start

getcpuid:
   pushl %ebp
   movl %esp, %ebp

/* CPUID called with "EAX=0" returns the CPU's manufacturer ID
   in EBX, EDX, ECX */
   movl 8(%ebp), %eax
   cpuid
   movl $output, %edi
   movl %ebx, 28(%edi)
   movl %edx, 32(%edi)
   movl %ecx, 36(%edi)

/* write(STDOUT, output, strlen(output); */
/* __NR_WRITE to %eax */
/* length of the string into %edx */
/* STDOUT into %ebx */
/* address of the string to %ecx */
   movl $4, %eax
   movl $1, %ebx
   movl $output, %ecx
   movl $42, %edx
   int $0x80

   movl %ebp, %esp
   popl %ebp
   ret

_start:
   nop

/* void getcpuid(0); */
   pushl $0
   call getcpuid
   add $4, %esp

/* exit(0); */
/* system call number into %eax */
/* return code to %ebx */
   movl $1, %eax
   movl $0, %ebx
   int $0x80
--------------------------------------------
# as -gstabs cpuid.s -o cpuid.o
# ld cpuid.o -o cpuid
# ./cpuid
The processor Vendor ID is 'GenuineIntel'
objdump -d cpuid.o
objdump -s cpuid.o

gdb ./cpuid
gdb) break *_start+1
gdb) run
gdb) next
gdb) info registers
gdb) print/x $eax
--------------------------------------------
Reference:
Professional Assembly Language By Richard Blum
01 July 2009
Linux Kernel Memory - 4
PCI devices have access to three address spaces;
PCI I/O, PCI Memory (used by the PCI initialization code) and PCI Configuration space (used by the device drivers).
virt_to_phys(virt_addr) = __pa(virt_addr) = Virt Addr - 0xC0000000
phys_to_virt(phy_addr) = __va(phy_addr) = Phy Addr + 0xC0000000
Check the given physical memory is in RAM:
if (phy_addr < virt_to_phys(high_memory)) {
The given physical memory is in RAM
}
ioremap:
area = get_vm_area(size, VM_IOREMAP); (return a free area in virtual addres space)
remap_area_pages(virt_addr, phys_addr, size, flags); (update PGD, PMD and PTE table)
vmalloc:
area = get_vm_area(size, VM_ALLOC); (return a free area in virtual addres space)
vmalloc_area_pages(virt_addr, size, flags, prot); (update PGD, PMD and PTE table)
iounmap: vfree:
vmfree_area_pages(virt_addr, size); (update PGD, PMD and PTE table)
request_mem_region (Phy Addr, Length, Name);
pci_request_regions (PDev, Name); (to update "/proc/iomem")
Reference:
http://tldp.org/LDP/tlk/dd/pci.html
http://linuxgazette.net/issue83/thangaraju.html
PCI I/O, PCI Memory (used by the PCI initialization code) and PCI Configuration space (used by the device drivers).
virt_to_phys(virt_addr) = __pa(virt_addr) = Virt Addr - 0xC0000000
phys_to_virt(phy_addr) = __va(phy_addr) = Phy Addr + 0xC0000000
Check the given physical memory is in RAM:
if (phy_addr < virt_to_phys(high_memory)) {
The given physical memory is in RAM
}
ioremap:
area = get_vm_area(size, VM_IOREMAP); (return a free area in virtual addres space)
remap_area_pages(virt_addr, phys_addr, size, flags); (update PGD, PMD and PTE table)
vmalloc:
area = get_vm_area(size, VM_ALLOC); (return a free area in virtual addres space)
vmalloc_area_pages(virt_addr, size, flags, prot); (update PGD, PMD and PTE table)
iounmap: vfree:
vmfree_area_pages(virt_addr, size); (update PGD, PMD and PTE table)
How does ioremap and vmalloc relatted???
request_mem_region (Phy Addr, Length, Name);
pci_request_regions (PDev, Name); (to update "/proc/iomem")
------------------------------------------------
ethtool –i eth0
  driver: e1000
  version: 7.0.38
  firmware-version: N/A
  bus-info: 02:03.0

./pcidump /proc/bus/pci/02/03.0
  …
  B0 Base Address 0: fc200004
  B1 Base Address 1: 00000000
  B2 Base Address 2: 00000000
  B3 Base Address 3: 00000000
  B4 Base Address 4: 00003001
  B5 Base Address 5: 00000000
  …

cat /proc/iomem
 …
 c2e2a000-c3f00000 : Bigphysarea
 fc100000-fc4fffff : PCI Bus #01
  fc200000-fc3fffff : PCI Bus #02
    fc200000-fc21ffff : PCI device 8086:1010
      fc200000-fc21ffff : e1000
    fc300000-fc3fffff : PCI Bus #03
      fc300000-fc30ffff : PCI device 170b:0100
  fc400000-fc4fffff : PCI Bus #04
    fc400000-fc41ffff : PCI device 8086:1079
      fc400000-fc41ffff : e1000
 fc500000-fc500fff : PCI device 1002:4752
 …
------------------------------------------------
Reference:
http://tldp.org/LDP/tlk/dd/pci.html
http://linuxgazette.net/issue83/thangaraju.html
Linux Kernel Memory - 3
Why page cache is required???
When a code is opened in text editor, data from the file is read into memory from disk. Later when you compile the file, the kernel can use the pages directly from the page cache.
The page cache is a cache of pages.
The pages in page cache can originate from read and write of regular file system files, block device files, and memory-mapped files.
Physical page size = 4KB
Physical block size = 512byte
Linux 2.2 – the page cache and the buffer cache
Linux 2.4 – the page cache
-> Clean page
-> Dirty page
-> Locked page
bdflush -> when memory is low (2.2)
kupdated -> called periodically (2.2)
pdflush -> dirty page flush (2.6)
pdflush daemon – "dirty page flush"
-> When free memory shrinks below a specified threshold, the kernel write dirty data back to disk.
-> When dirty data grows older than a specific threshold, old data is written back to disk. This happens periodically.
-> The different pdflush thread allows it to concentrate on different device queue.
-> The number of pdflush thread varies with a min of 2 and max of 8.
-> If all existing pdflush threads are busy for at least one second, a new pdflush thread is created
-> If pdflush thread sleep for more than asecond, it is terminated
Reference:
Linux Kernel Development - Robert Love
Linux Kernel Memory - 2
Kernel manages physical memory.
Kernel also manages process address space.
Virtual memory technique enables operating system to execute a program which is larger than the physical memory.
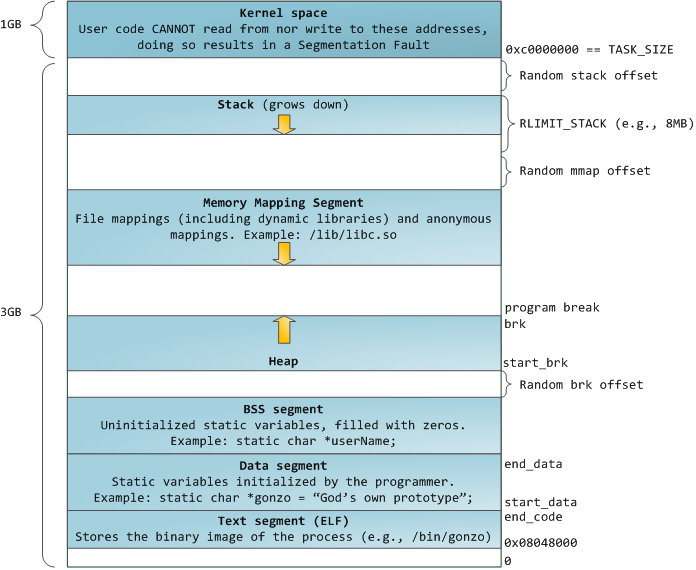
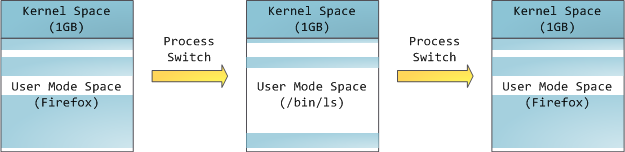
How does kernel threads work ???
Kernel space is constantly present (never gets swapped out) and maps the same physical memory in all processes
Linux kernel divides the process address space into Virtual Memory Area (VMA). Each VMA can have unique access permissions.
If a process try to access memory address not in a valid memory area the kernel kills the process with the dreaded “Segmentation Fault” message.

strip new
ldd new
readelf –a new
Reference:
http://blog.chinaunix.net/u2/70942/showart_1227245.html
http://www.c.happycodings.com/Gnu-Linux/code6.html
Kernel also manages process address space.
Linux is a virtual memory operating system.
Virtual memory technique enables operating system to execute a program which is larger than the physical memory.
Kernel thread do not have process address space, hence no memory descriptor. Even kernel threads require page table to access kernel memory.
How does kernel threads work ???
Kernel space is constantly present (never gets swapped out) and maps the same physical memory in all processes
Linux kernel divides the process address space into Virtual Memory Area (VMA). Each VMA can have unique access permissions.
If a process try to access memory address not in a valid memory area the kernel kills the process with the dreaded “Segmentation Fault” message.
The Linux kernel maintains a private page table for each program.
Each process has its own page table (threads share them).mmap() creates a new VMA.
------------start new.c-----------size new
#include <stdio.h>
#include <fcntl.h>
#include <sys/mman.h>
int main()
{
char buffer [200] = {};
char filename [] = "test.txt";
char buf [] = "HELLO WORLD!!!\n";
int file;
void *target;
if((file = open(filename, O_RDWR|O_CREAT, 0777)) == -1)
fprintf(stderr, "%s: Error: opening file: %s\n", \
"mmap", filename), exit(1);
lseek(file, strlen(buf) - 1, SEEK_SET);
write(file, '\0', 1);
if((target = mmap(0, strlen(buf), PROT_READ|PROT_WRITE, \
MAP_SHARED, file, 0)) == (void *) -1)
fprintf(stderr, "Error mapping input file: %s\n", filename), exit(1);
memcpy(target, buf, strlen(buf));
sprintf(buffer, "cat /proc/%d/maps", getpid());
printf("%s\n", system(buffer));
munmap(target, strlen(buf));
return 0;
}
----------------------------------
gcc –o new new.c
./new
---------------output-------------
08048000-08049000 r-xp 00000000 03:03 65519 /home/humble/new
08049000-0804a000 rw-p 00000000 03:03 65519 /home/humble/new
0804a000-0804b000 rwxp 00000000 00:00 0
40000000-40013000 r-xp 00000000 03:02 292049 /lib/ld-2.x.so
40013000-40014000 rw-p 00013000 03:02 292049 /lib/ld-2.x.so
40014000-40015000 rw-s 00000000 03:03 65707 /home/humble/test.txt
42000000-4212c000 r-xp 00000000 03:02 308273 /lib/i686/libc-2.x.so
4212c000-42131000 rw-p 0012c000 03:02 308273 /lib/i686/libc-2.x.so
42131000-42135000 rw-p 00000000 00:00 0
bfffd000-c0000000 rwxp ffffe000 00:00 0
----------------------------------
strip new
ldd new
readelf –a new
Reference:
http://blog.chinaunix.net/u2/70942/showart_1227245.html
http://www.c.happycodings.com/Gnu-Linux/code6.html
Linux Kernel Memory - 1
The code and data portion of every program should be loaded to physical memory before execution. Virtual memory technique enables operating system to execute a program which is larger than the physical memory.
The binary addresses that the processor issues for either instructions or data are called virtual or logical addresses. These addresses are translated to physical addresses by a combination of hardware and software components. And the special hardware is called MMU.
Information about the main memory location of each page is kept in a page table. Though MMU is implemented in hardware, page table is kept in main memory because of its large size. For faster access a small portion page table is kept in a small cache called TLB.
Address translation proceeds as follows:
Given a virtual address, the MMU looks in the TLB for the reference page.
-> If the page table entry for this page is found in the TLB, the physical address is obtained immediately.
-> If there is a miss the TLB, then the required entry is obtained from the page table in the main memory, and the TLB is updated.
The kernel treats physical pages as the basic unit of memory management.
In terms of virtual memory, pages are the smallest.
Possible owners of pages include user-space process, dynamically allocated kernel data, static kernel code, the page cache, and so on.
The kernel uses zones to group pages of similar properties.
ZONE_DMA DMA-able pages < 16MB
ZONE_NORMAL Normal addressable pages 16-896MB
ZONE_HIGHMEM Dynamically mapped pages > 896MB
alloc_page(gpf_mask) -> allocate from high memory, returns struct page.
kmap(*page) -> to map high memory into the kernel's logical address space.
get_free_page(gfp_mask)
get_zeroed_page(gfp_mask)
free_page(addr)
kmalloc returns logical address,,, but its physically and virtually contiguous.
vmalloc returns logical address,,, but its only virtually contiguous.
kmalloc(size, flags) -> it’s the simple interface to obtain kernel memory in byte-sized chunks. The region of memory allocated is physically contiguous.
vmalloc(size) -> it allocates memory that is only virtually contiguous and not necessarily physically contiguous. Its does this by allocating potentially noncontiguous chunks of physical memory and “fixing up” the page tables to map the memory into a contiguous chunk of the logical address space.
Why kmalloc is used more than vmalloc?
-> The vmalloc() function must specifically set up the page table entries.
-> Page obtained via vmalloc() cause greater TLB trashing than when using directly mapped memory.
-> vmalloc() is used when modules are dynamically inserted into the kernel.
Slab Layer:
Thw slab layer divides different objects into groups called caches, each of which stores a different type of object. There is one cache per object type.
cache(DATA STRUCT) -> slabs(PAGES) -> objects(STRUCT)
Caches are created at system startup for process descriptor, inode, etc. The kmalloc() interface is built on top of the slab layer using a family of general purpose caches.
kmem_cache_create(name. size, offset, size, ctor, dtor) -> mm_cachep, task_struct_cachep, inode_cachep, etc
kmem_getpages(cachep, flags) -> slabs
kmem_cahe_alloc(cachep, flags) -> objects
Most 32-it architectures have 4KB pages.
And most 64-bit architectures have 8KB pages.
kernel stack for 32-bit architecture 8KB.
kernel stack for 64-bit architecture 16KB.
Reference:
Linux Kernel Development - Robert Love
The binary addresses that the processor issues for either instructions or data are called virtual or logical addresses. These addresses are translated to physical addresses by a combination of hardware and software components. And the special hardware is called MMU.
Information about the main memory location of each page is kept in a page table. Though MMU is implemented in hardware, page table is kept in main memory because of its large size. For faster access a small portion page table is kept in a small cache called TLB.
Address translation proceeds as follows:
Given a virtual address, the MMU looks in the TLB for the reference page.
-> If the page table entry for this page is found in the TLB, the physical address is obtained immediately.
-> If there is a miss the TLB, then the required entry is obtained from the page table in the main memory, and the TLB is updated.
The kernel treats physical pages as the basic unit of memory management.
In terms of virtual memory, pages are the smallest.
Possible owners of pages include user-space process, dynamically allocated kernel data, static kernel code, the page cache, and so on.
The kernel uses zones to group pages of similar properties.
ZONE_DMA DMA-able pages < 16MB
ZONE_NORMAL Normal addressable pages 16-896MB
ZONE_HIGHMEM Dynamically mapped pages > 896MB
alloc_page(gpf_mask) -> allocate from high memory, returns struct page.
kmap(*page) -> to map high memory into the kernel's logical address space.
get_free_page(gfp_mask)
get_zeroed_page(gfp_mask)
free_page(addr)
kmalloc returns logical address,,, but its physically and virtually contiguous.
vmalloc returns logical address,,, but its only virtually contiguous.
kmalloc(size, flags) -> it’s the simple interface to obtain kernel memory in byte-sized chunks. The region of memory allocated is physically contiguous.
Process context, can sleep      GFP_KERNEL
Process context, cannot sleep   GFP_ATOMIC (from emergency pool)
Interrupt handler               GFP_ATOMIC
Bottom half                     GFP_ATOMIC
Need DMA,can sleep              GFP_DMA | GFP_KERNEL
Need DMA,cannot sleep           GFP_DMA | GFP_ATOMIC
vmalloc(size) -> it allocates memory that is only virtually contiguous and not necessarily physically contiguous. Its does this by allocating potentially noncontiguous chunks of physical memory and “fixing up” the page tables to map the memory into a contiguous chunk of the logical address space.
Why kmalloc is used more than vmalloc?
-> The vmalloc() function must specifically set up the page table entries.
-> Page obtained via vmalloc() cause greater TLB trashing than when using directly mapped memory.
-> vmalloc() is used when modules are dynamically inserted into the kernel.
Slab Layer:
Thw slab layer divides different objects into groups called caches, each of which stores a different type of object. There is one cache per object type.
cache(DATA STRUCT) -> slabs(PAGES) -> objects(STRUCT)
Caches are created at system startup for process descriptor, inode, etc. The kmalloc() interface is built on top of the slab layer using a family of general purpose caches.
kmem_cache_create(name. size, offset, size, ctor, dtor) -> mm_cachep, task_struct_cachep, inode_cachep, etc
kmem_getpages(cachep, flags) -> slabs
kmem_cahe_alloc(cachep, flags) -> objects
Most 32-it architectures have 4KB pages.
And most 64-bit architectures have 8KB pages.
kernel stack for 32-bit architecture 8KB.
kernel stack for 64-bit architecture 16KB.
Reference:
Linux Kernel Development - Robert Love
Subscribe to:
Posts (Atom)